How to Integrate Xendit Payment Gateway in WordPress with Paymattic
Xendit is a leading payment gateway that simplifies online transactions for businesses in Indonesia, the Philippines, and across Southeast Asia. By integrating Xendit with Paymattic, you can offer your customers a wide array of local and international payment options, such as:
- VISA
- Mastercard
- American Express
- JCB
- Local bank transfers
- E-wallets
- And many more
This comprehensive guide will walk you through every step of configuring the Xendit payment gateway on your WordPress site using Paymattic.
Prerequisites
To get access to the Xendit payment gateway, you need the Paymattic Pro Plugin.
Configuring the Xendit Payment Method
The following steps will establish the core connection between Paymattic and your Xendit account. This is a one-time setup that involves installing the Xendit add-on, obtaining API keys, and configuring webhooks for seamless communication.
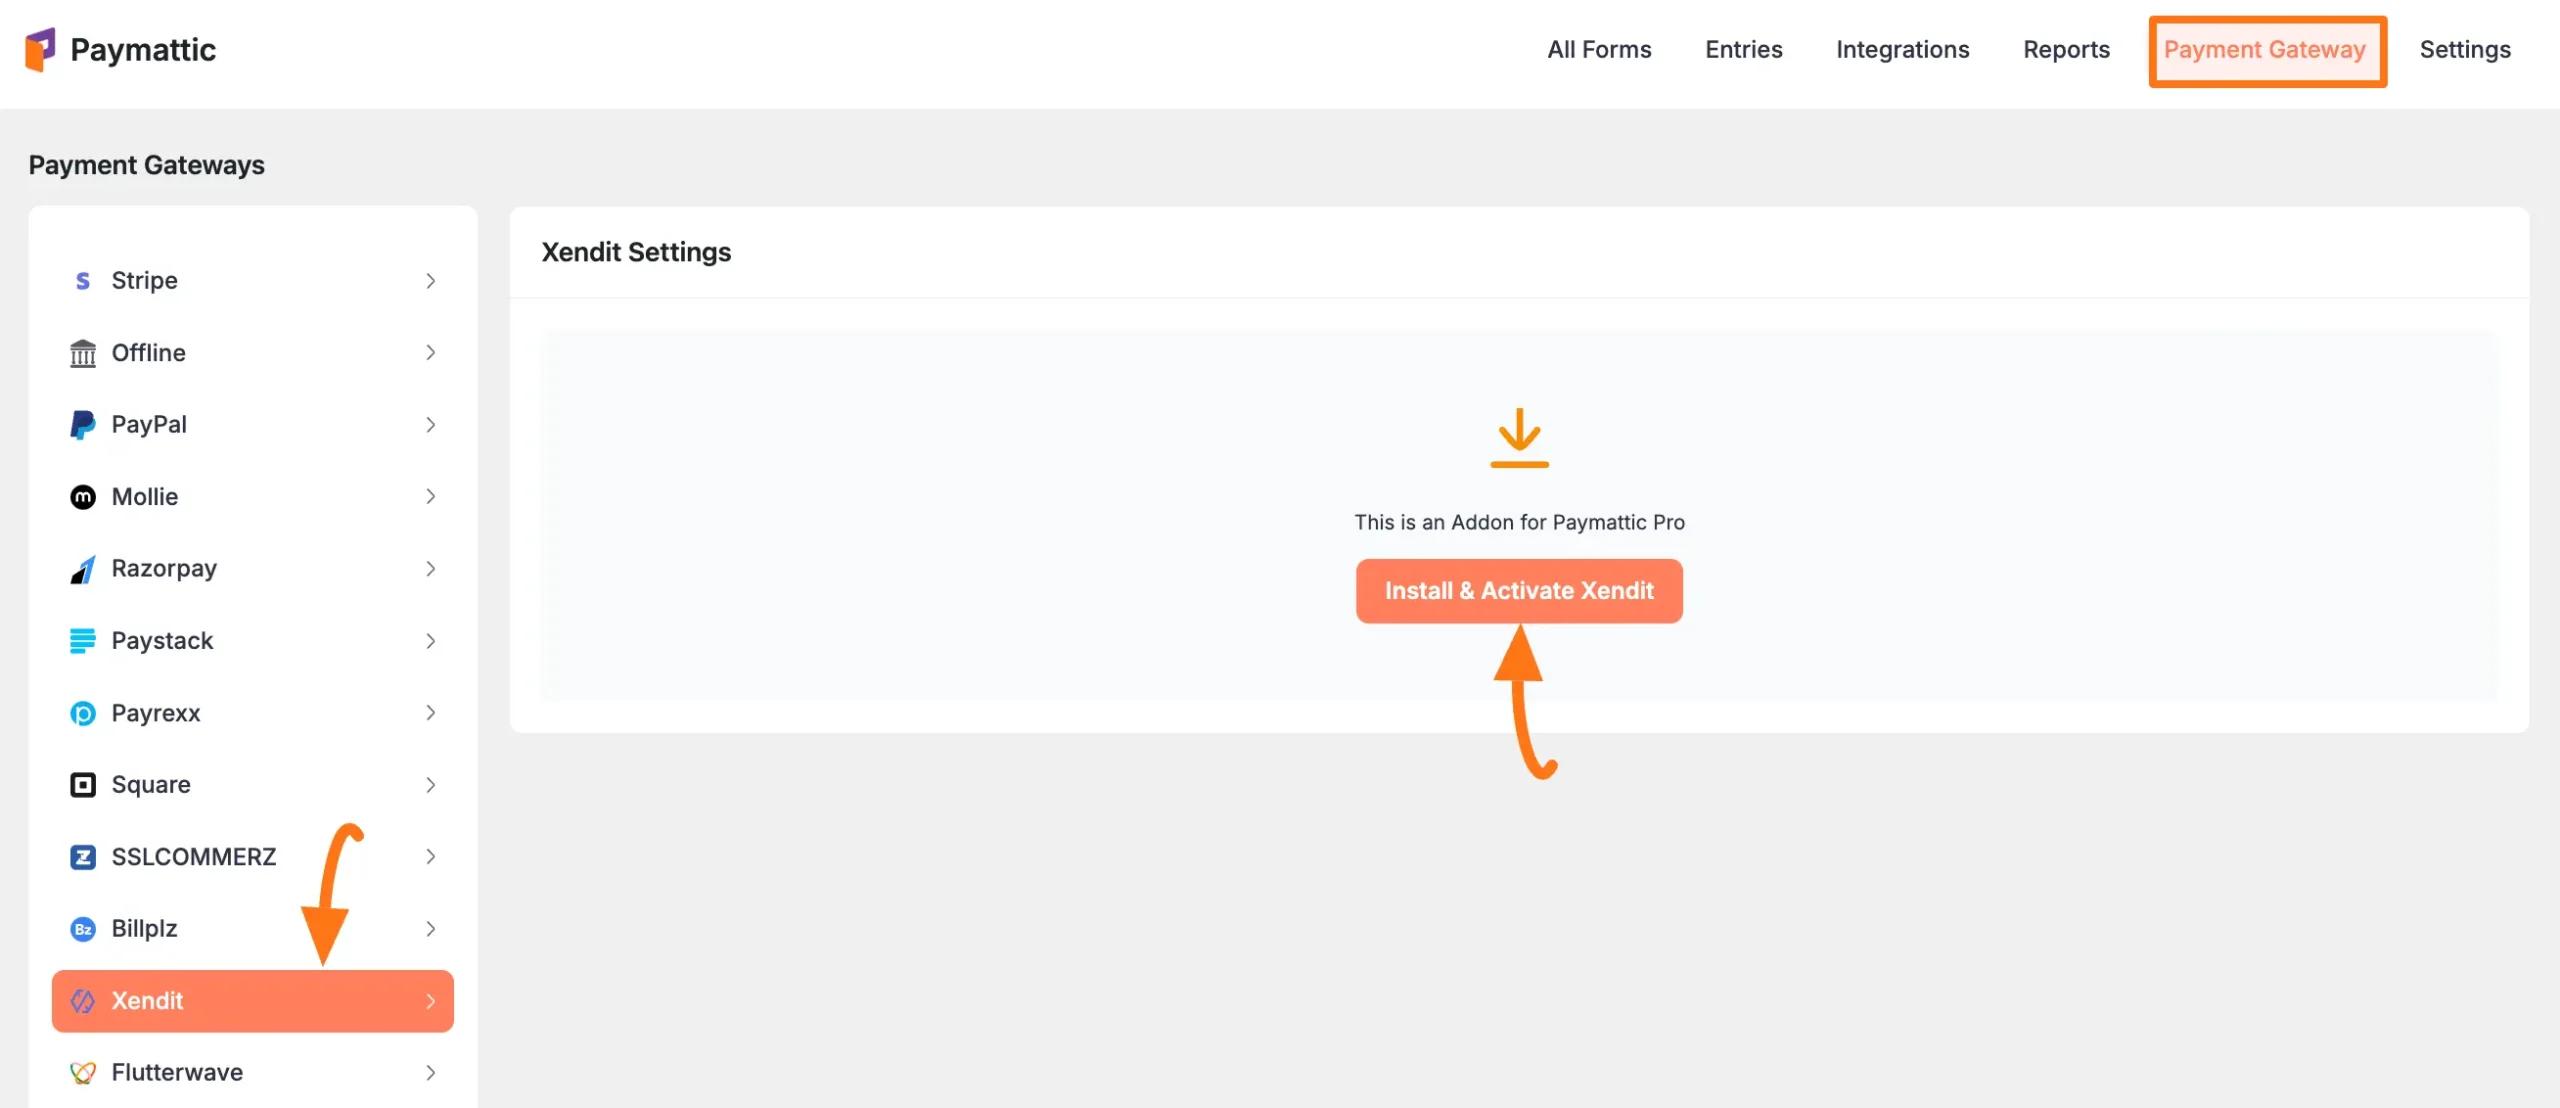
Step 1: Install and Activate the Xendit Add-on
Unlike some other gateways, Xendit integrates with Paymattic via a dedicated add-on that you must activate first.
- From your WordPress dashboard, navigate to Paymattic → Payment Gateway.
- Select the Xendit tab from the left sidebar to view the Xendit Settings page.
- You will see an Install and Activate Xendit button. Click this button to connect the Xendit module with your Paymattic Pro plugin.
Note
This add-on needs to be installed the first time you integrate with Xendit.
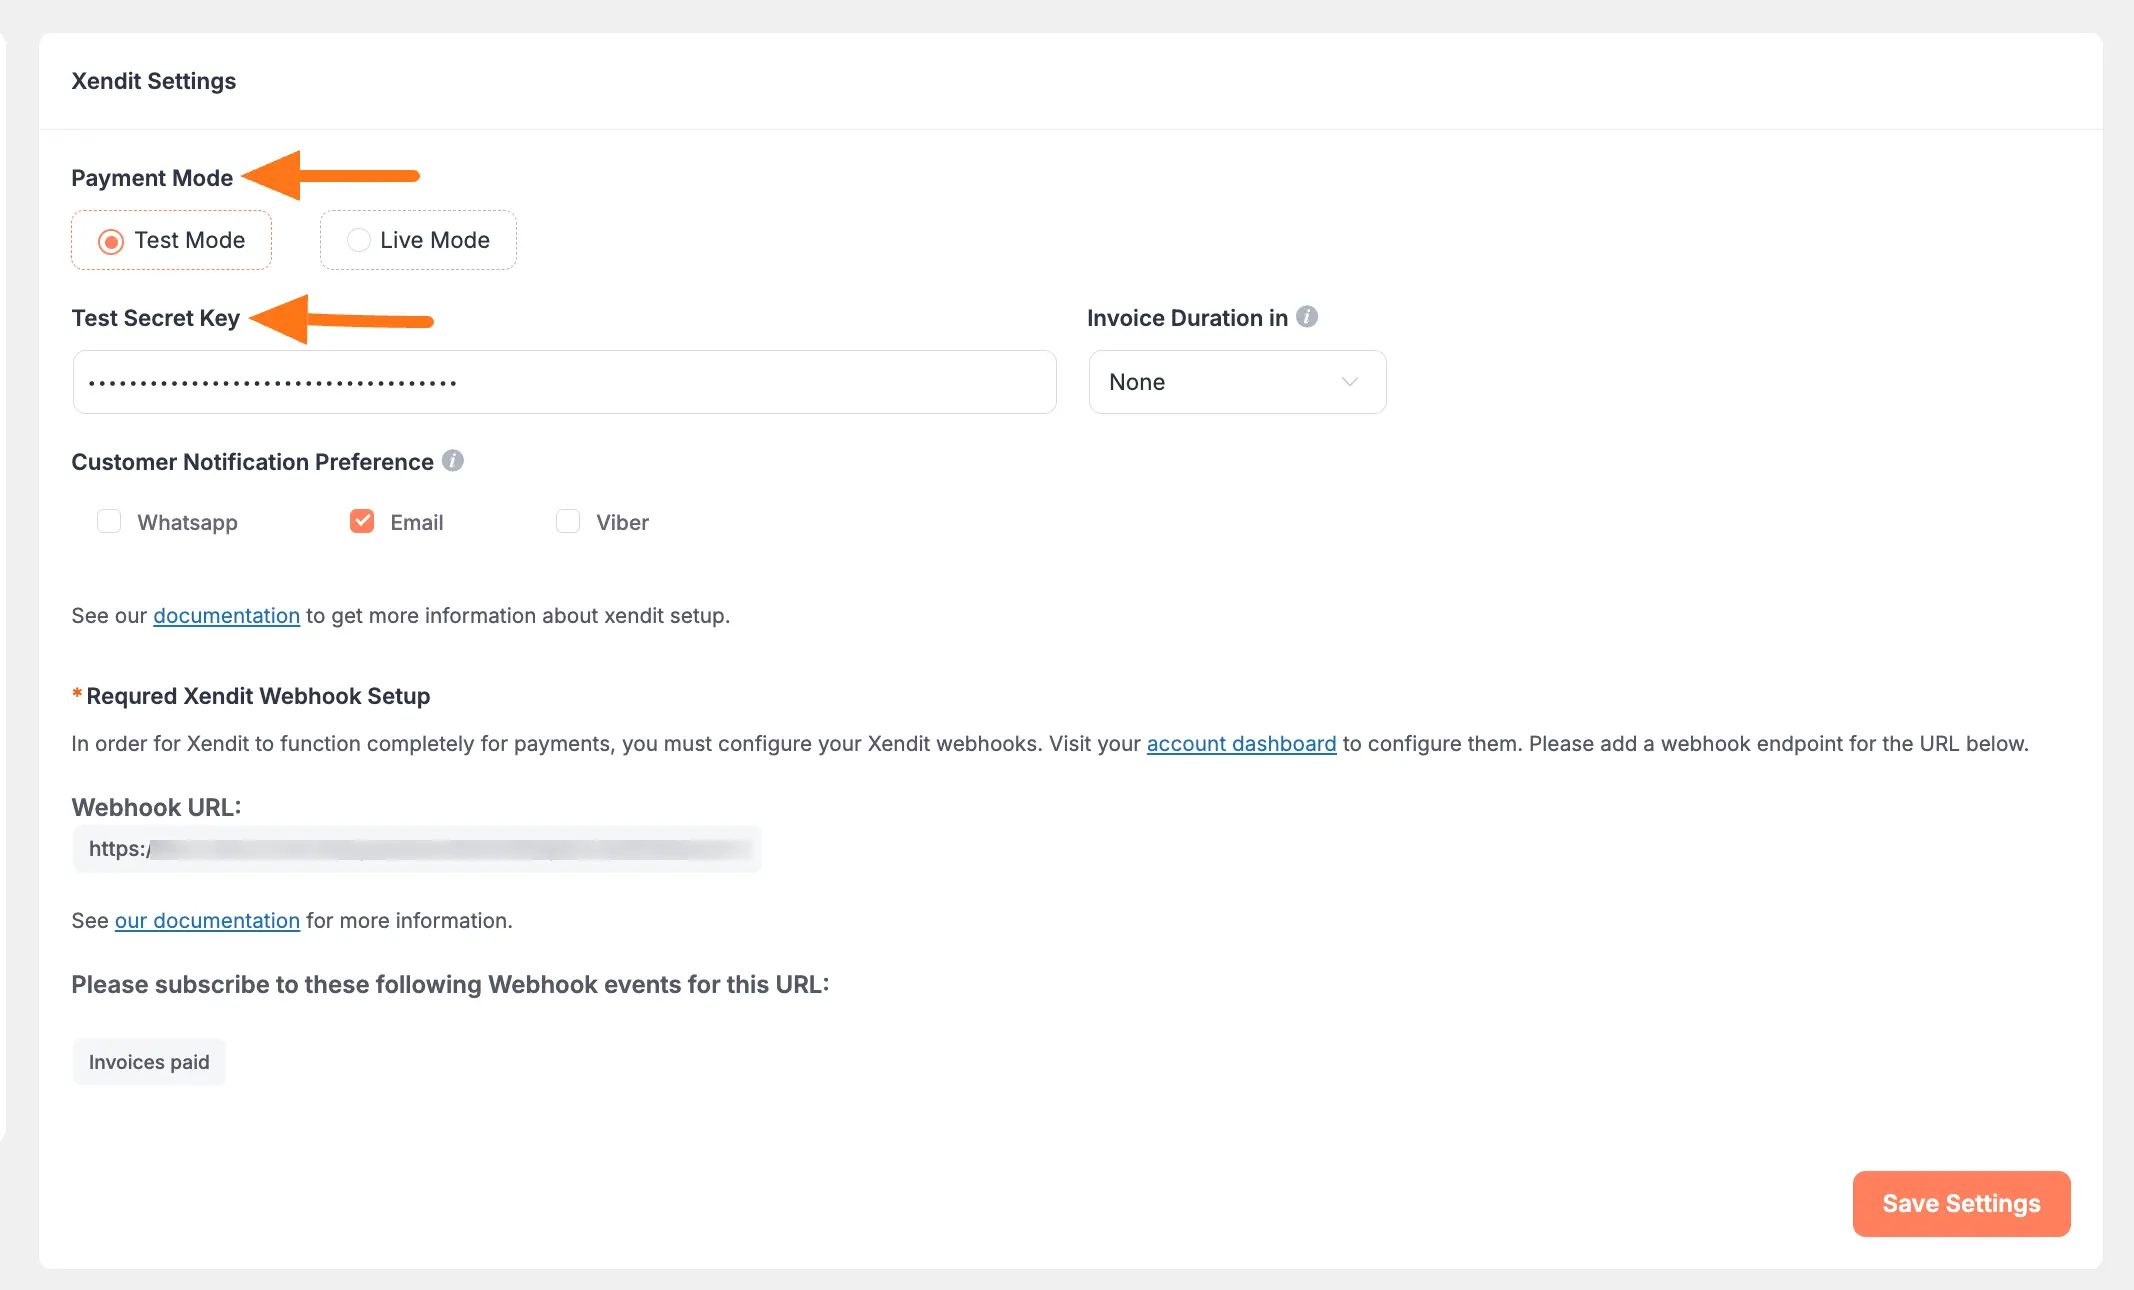
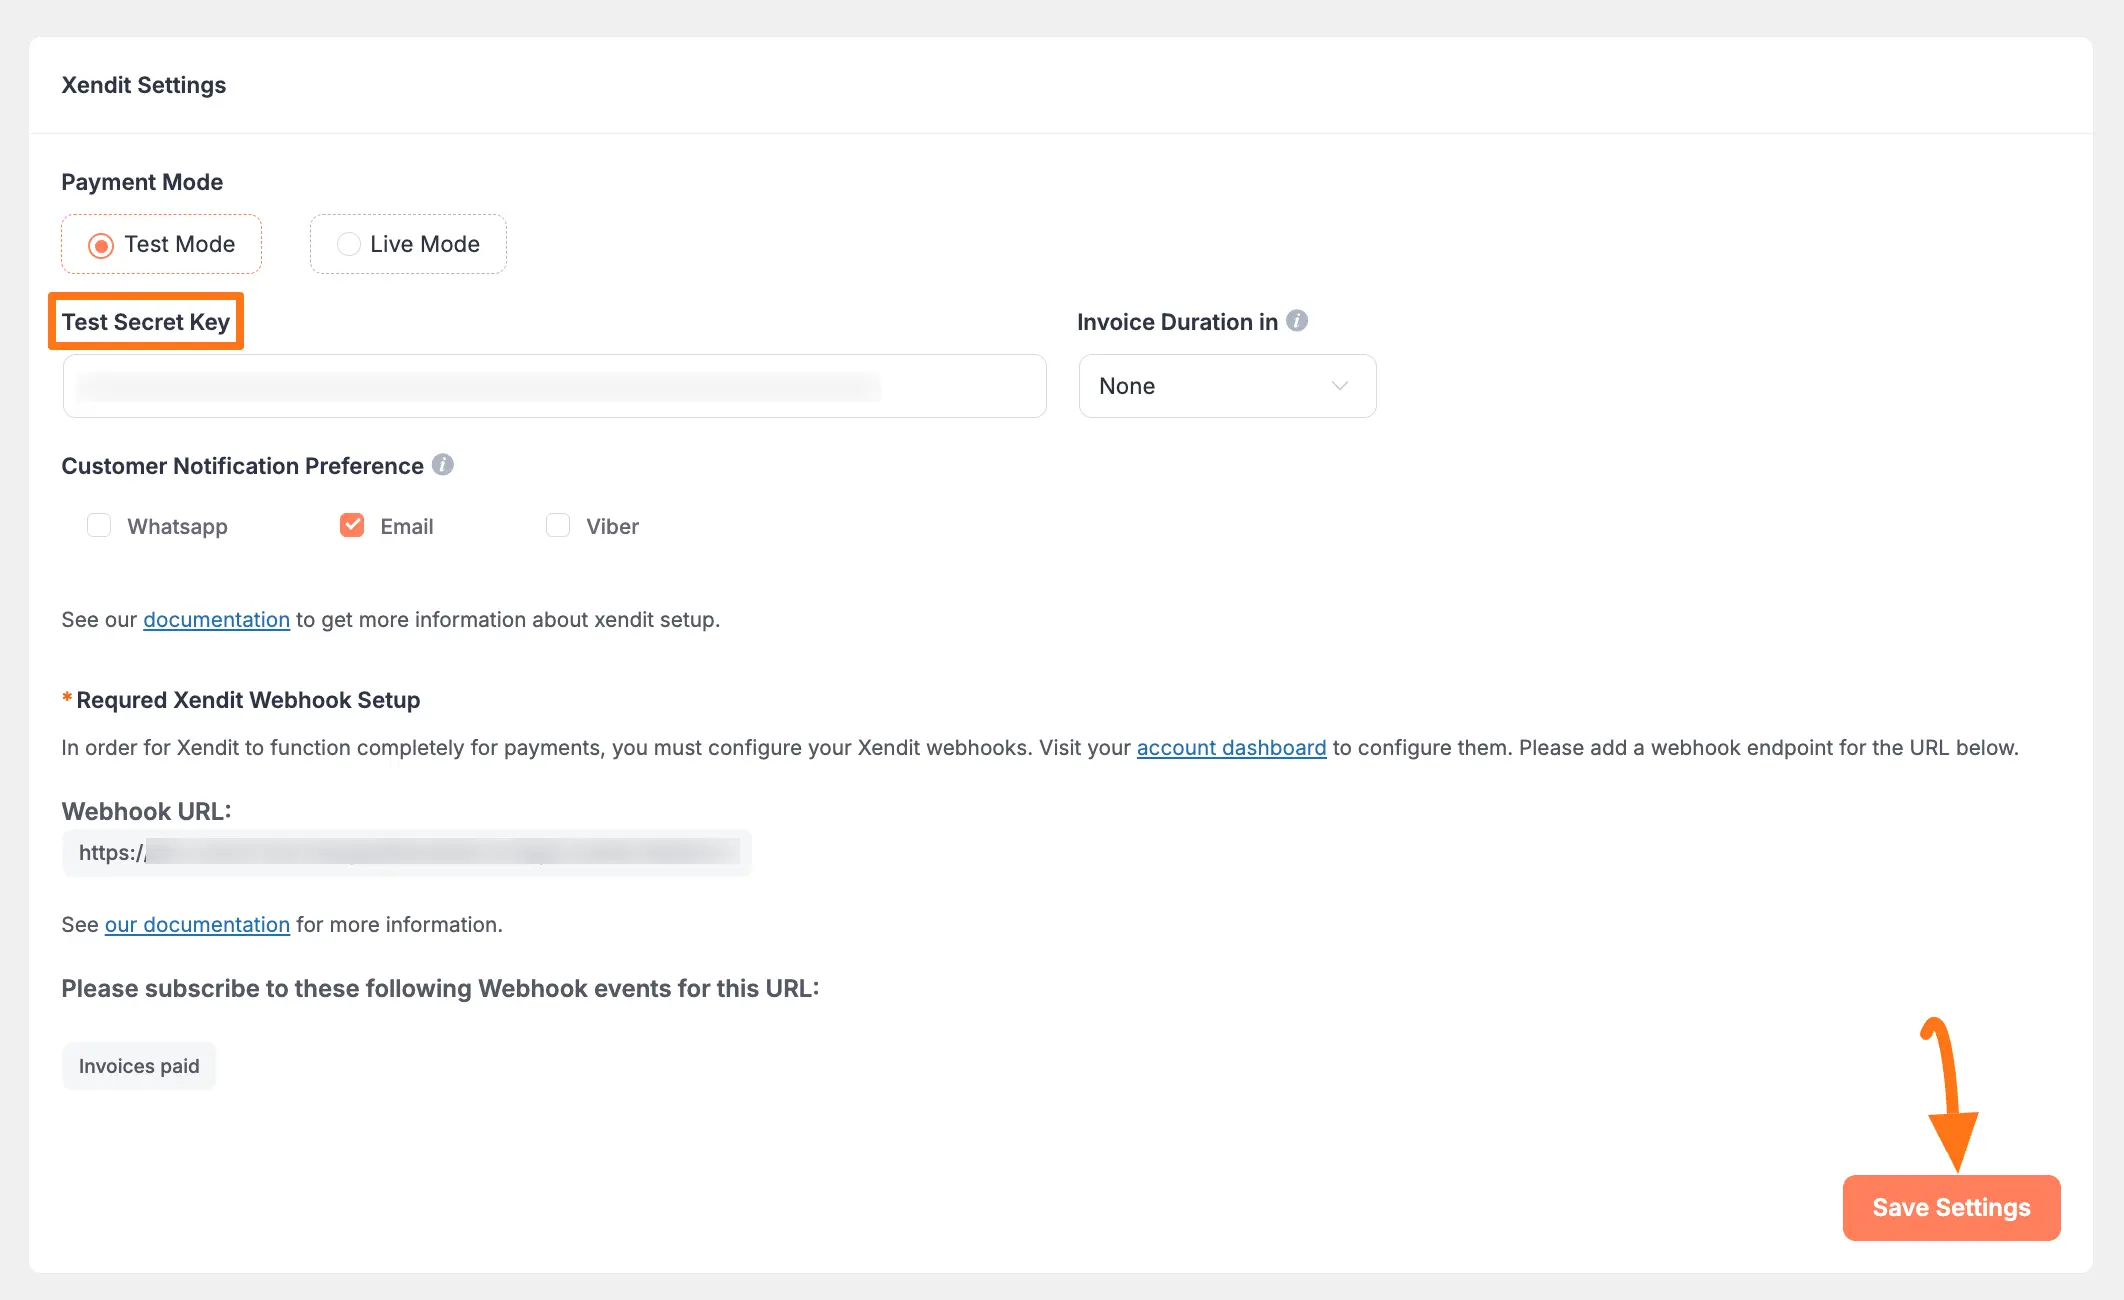
Step 2: Choose Your Payment Mode
After activation, you can set up the basic configuration. First, decide if you want to process live transactions or run tests.
Select your Payment Mode:
- Test Mode: This is a secure sandbox environment for testing your payment forms without using real money.
- Live Mode: Choose this when you are ready to accept real payments from your customers.
For this guide, we'll select Test Mode. The process is identical for both.
To connect your account, you will need a Test Secret Key from your Xendit Account. We will retrieve this in the next step.
Step 3: Generate and Copy Your Secret Key from Xendit
The Secret Key is a vital credential that authorizes Paymattic to process payments through your Xendit account. Here’s how to generate one.
Open a new browser tab and log in to your Xendit Account.
TIP
If you don't have an account, sign up here.
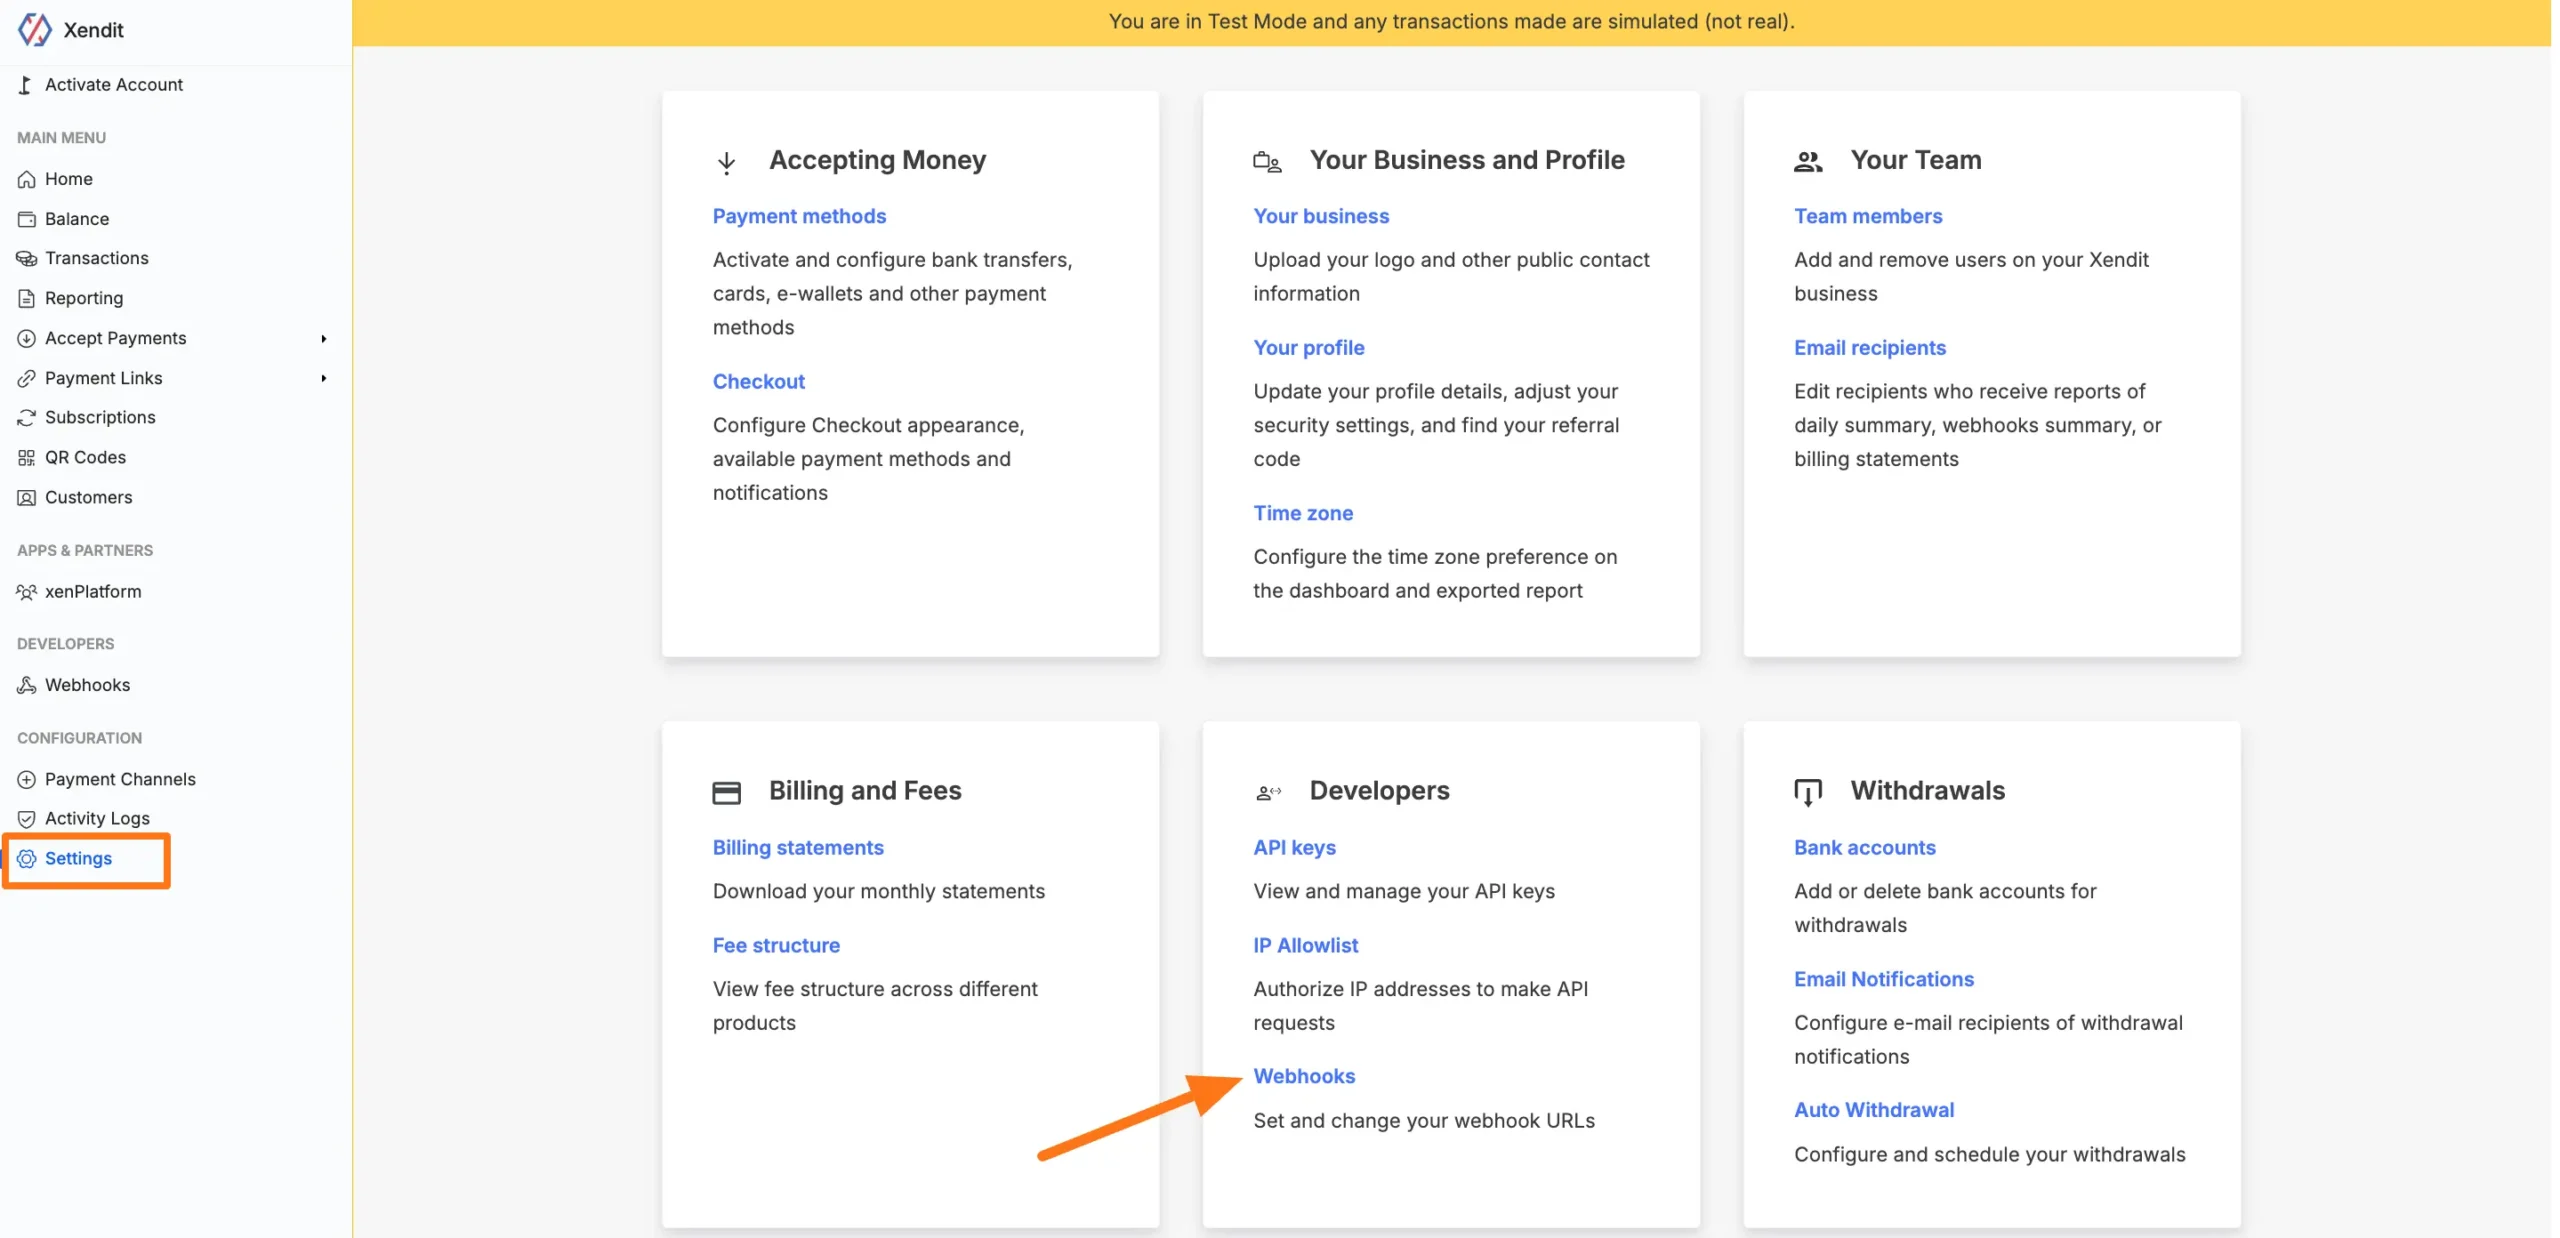
Once you are in the Xendit Dashboard, navigate to the Settings menu on the left sidebar. Under the Developers section, click on API Keys.
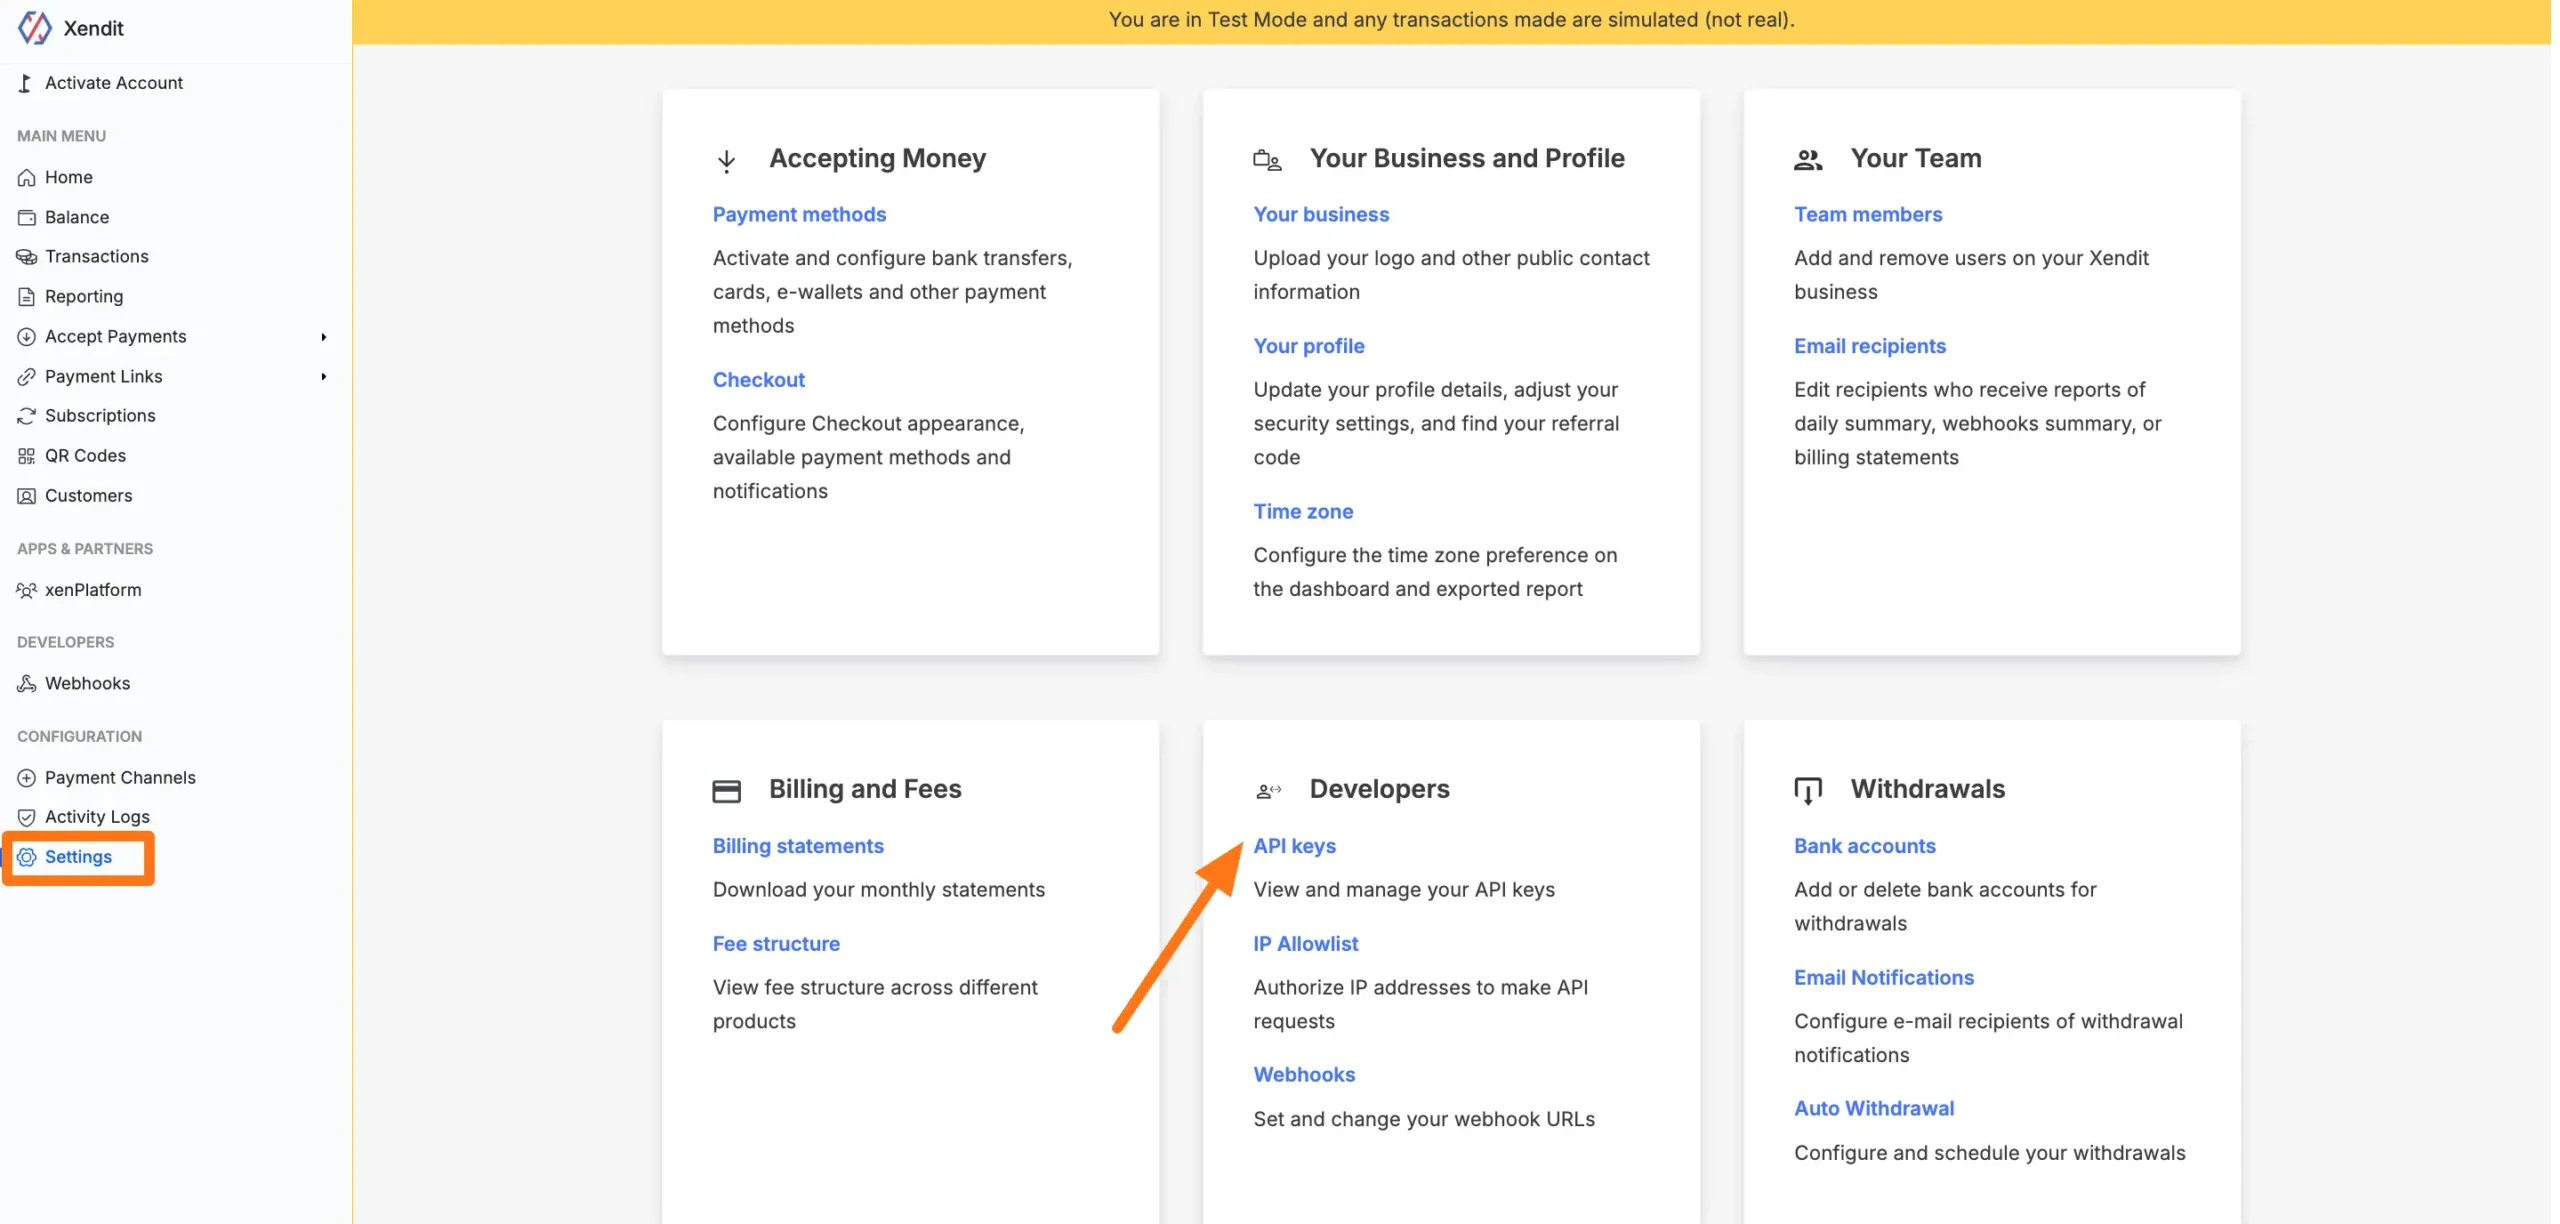
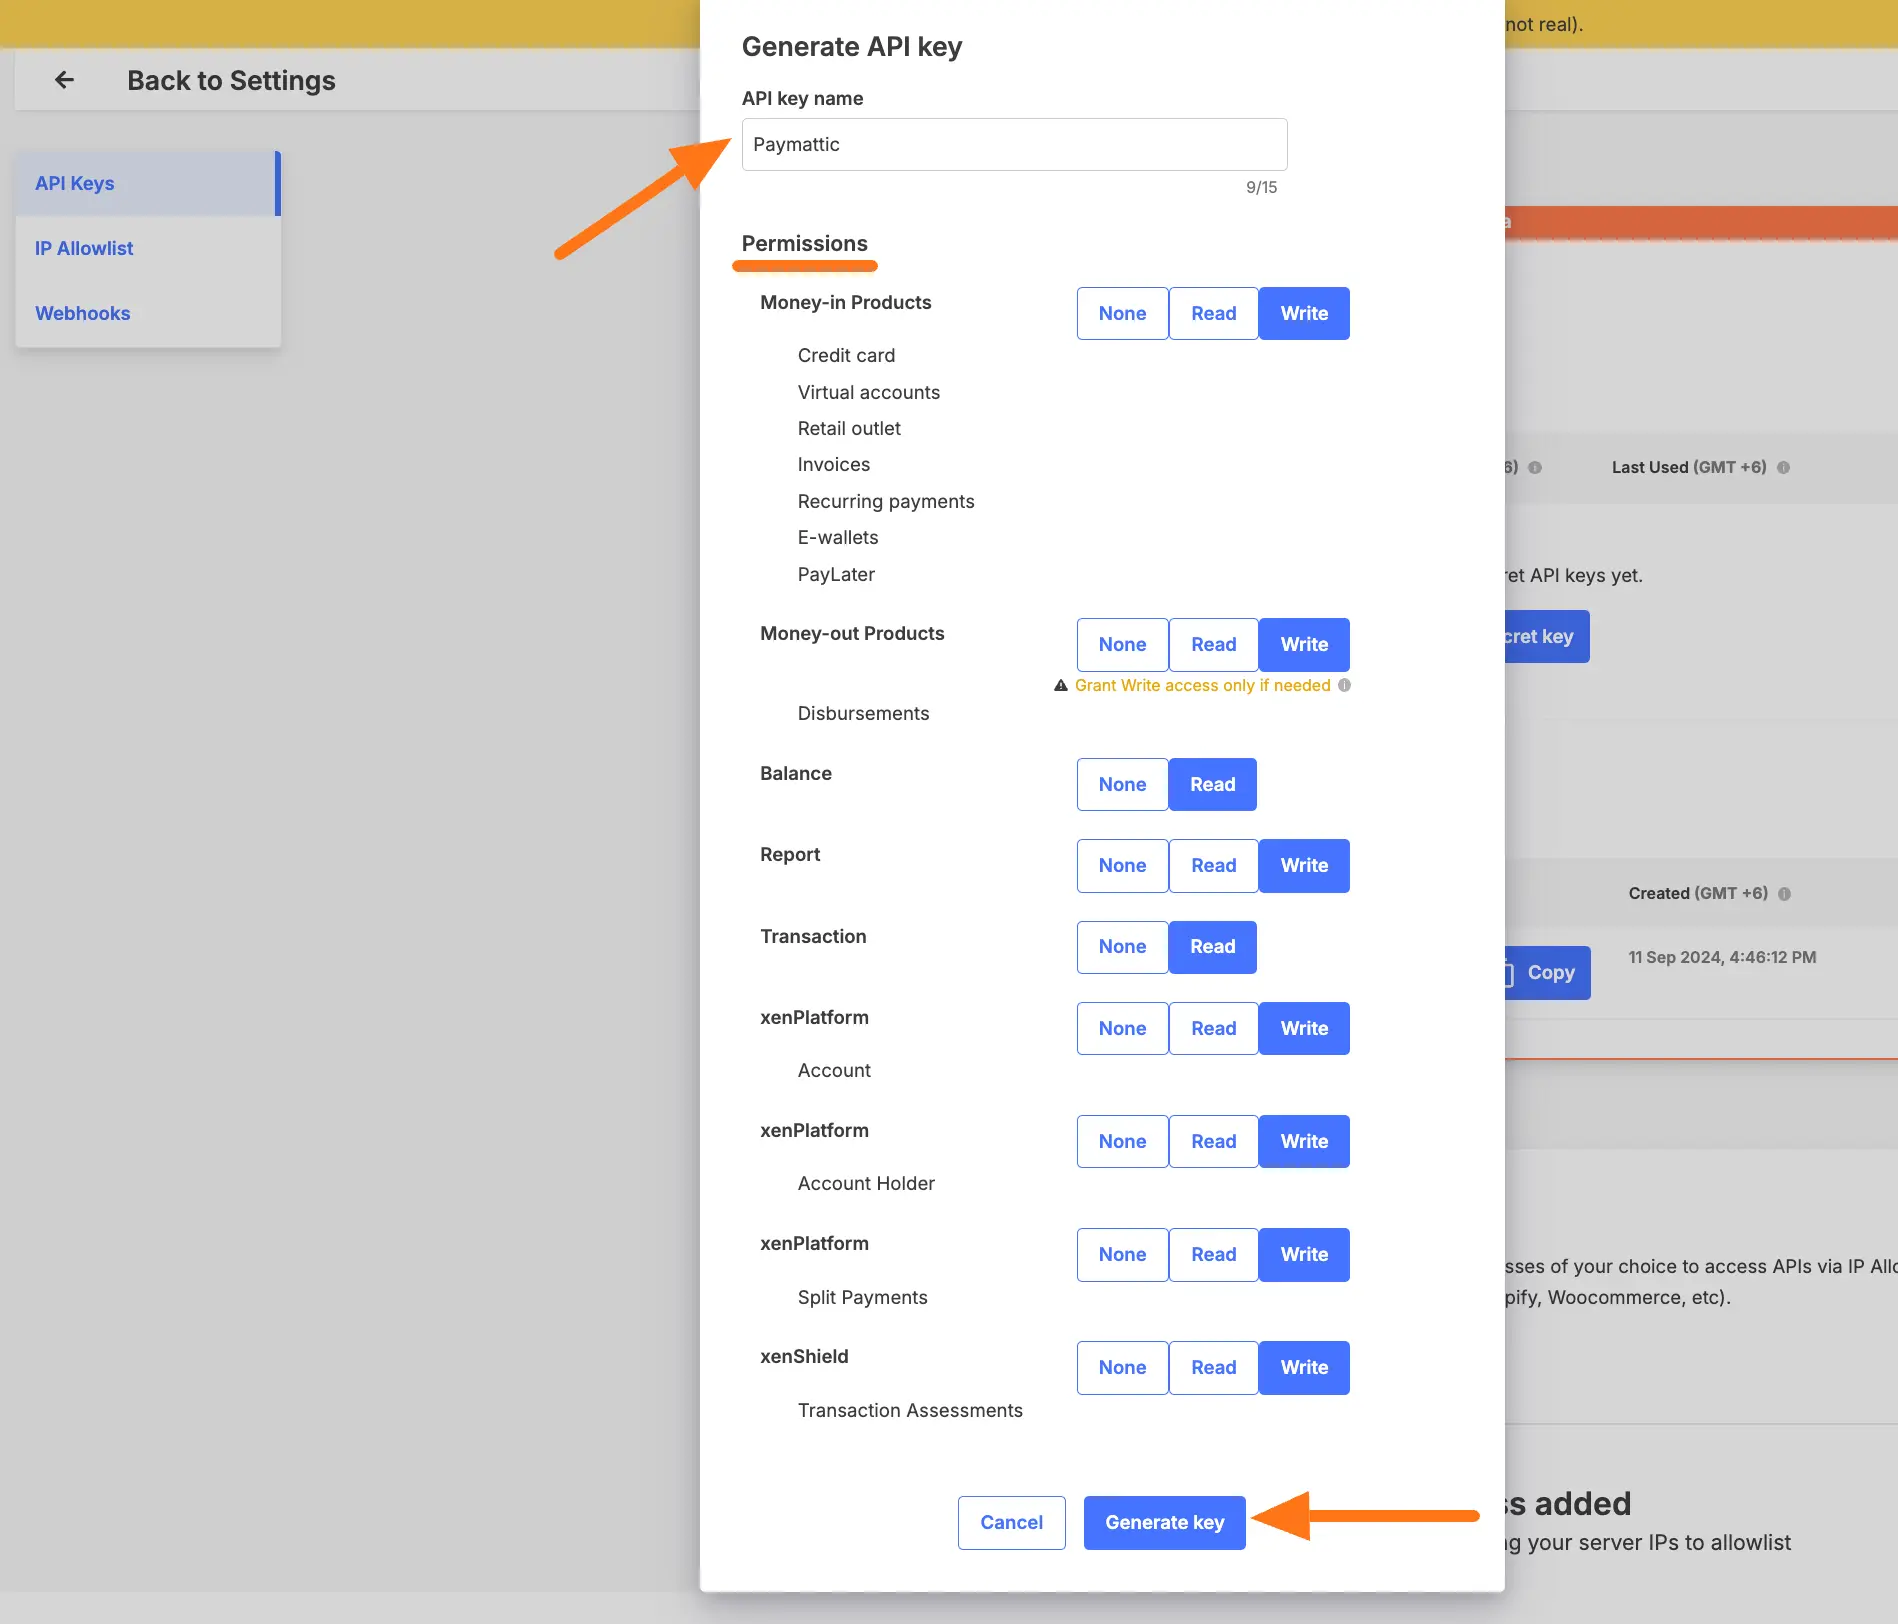
- On the API Keys page, click the + Generate secret key button to begin creating a new key.

- Now, you must configure the permissions for your new API key. These settings control what Paymattic is allowed to do within your Xendit account.
- Give your key a recognizable Name (e.g., "Paymattic Integration").
- Set the following Permissions to
WriteorReadas specified, to ensure full functionality:- Money-in Products – Write
- Money-out Products – Write
- Balance – Read
- Report – Write
- Transaction – Read
- xenPlatform (Account) – Write
- xenPlatform (Account Holder) – Write
- xenPlatform (Split Payments) – Write
- xenShield (Transaction Assessments) – Write
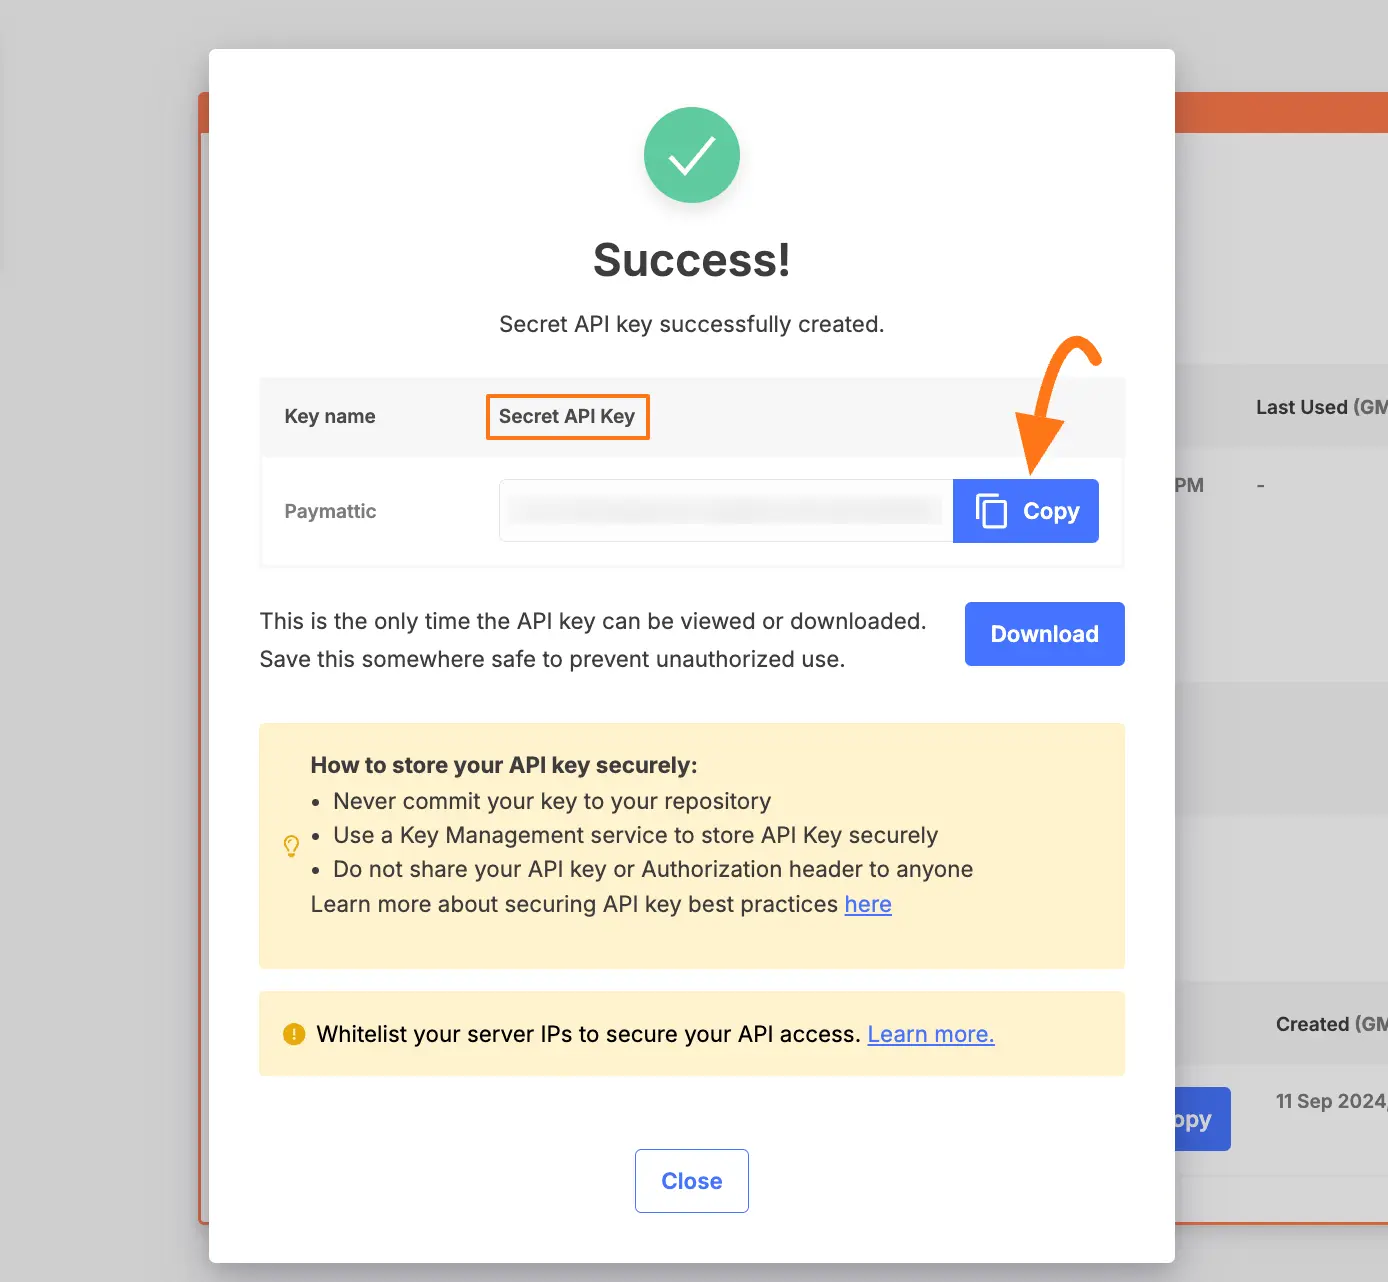
- Click the Generate Key button.
- A success popup will appear showing your newly generated key.
- Click the Copy button to copy your Secret API Key to your clipboard.
- Important: Xendit will only show you this key once. Make sure to paste it into Paymattic immediately or save it temporarily in a secure location.
Step 4: Finalize the Configuration in Paymattic
With the Secret Key copied, you can now complete the primary setup in your WordPress dashboard.
- Return to the Paymattic → Payment Gateway → Xendit tab.
- Paste the Secret Key you just copied into its corresponding field.
- Click Save Settings to complete the integration.
Optional: Additional Configuration
After the main setup, Paymattic offers a few extra settings to fine-tune your Xendit integration.
Invoice Duration & Customer Notification
These settings control the payment invoice lifecycle and how customers are notified.
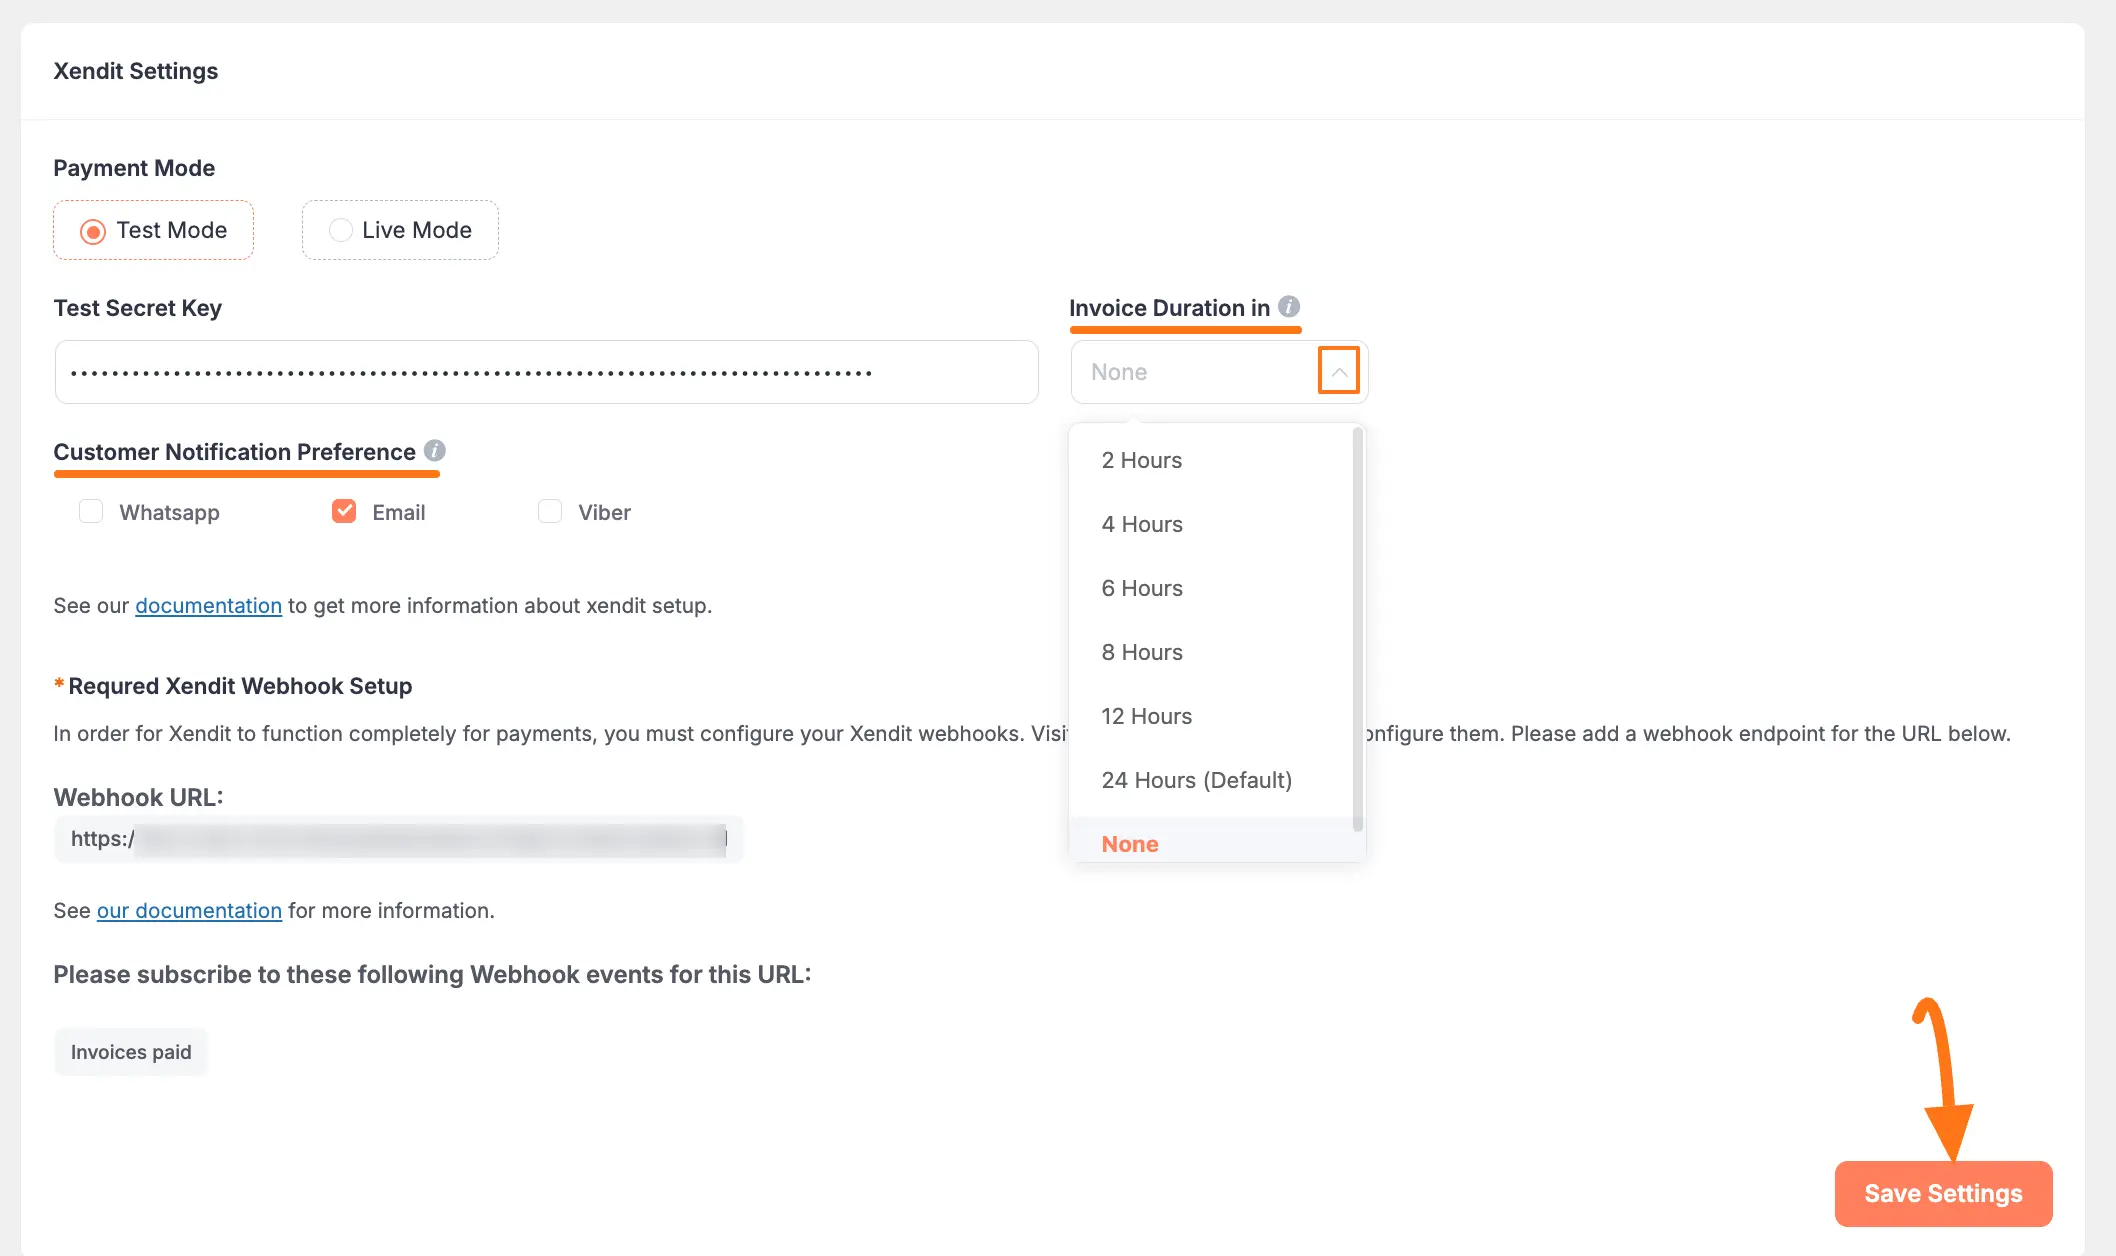
Invoice Duration: From this dropdown, you can select how long an invoice remains valid before it expires. If you want to use the default duration set in your Xendit dashboard, simply choose None.
Customer Notification Preference: Select your preferred notification settings for customers from the available options.
Important
Always click Save Settings after making any changes to your Xendit Settings.
Crucial: Configure Webhooks
Webhooks are essential for reliable payment processing. They allow Xendit to send real-time notifications back to your website, automatically updating payment statuses from 'Pending' to 'Paid'. Without this, you would have to update every transaction manually.
Important
To ensure your Xendit dashboard and Paymattic dashboard stay synchronized, you must configure Xendit Webhooks.
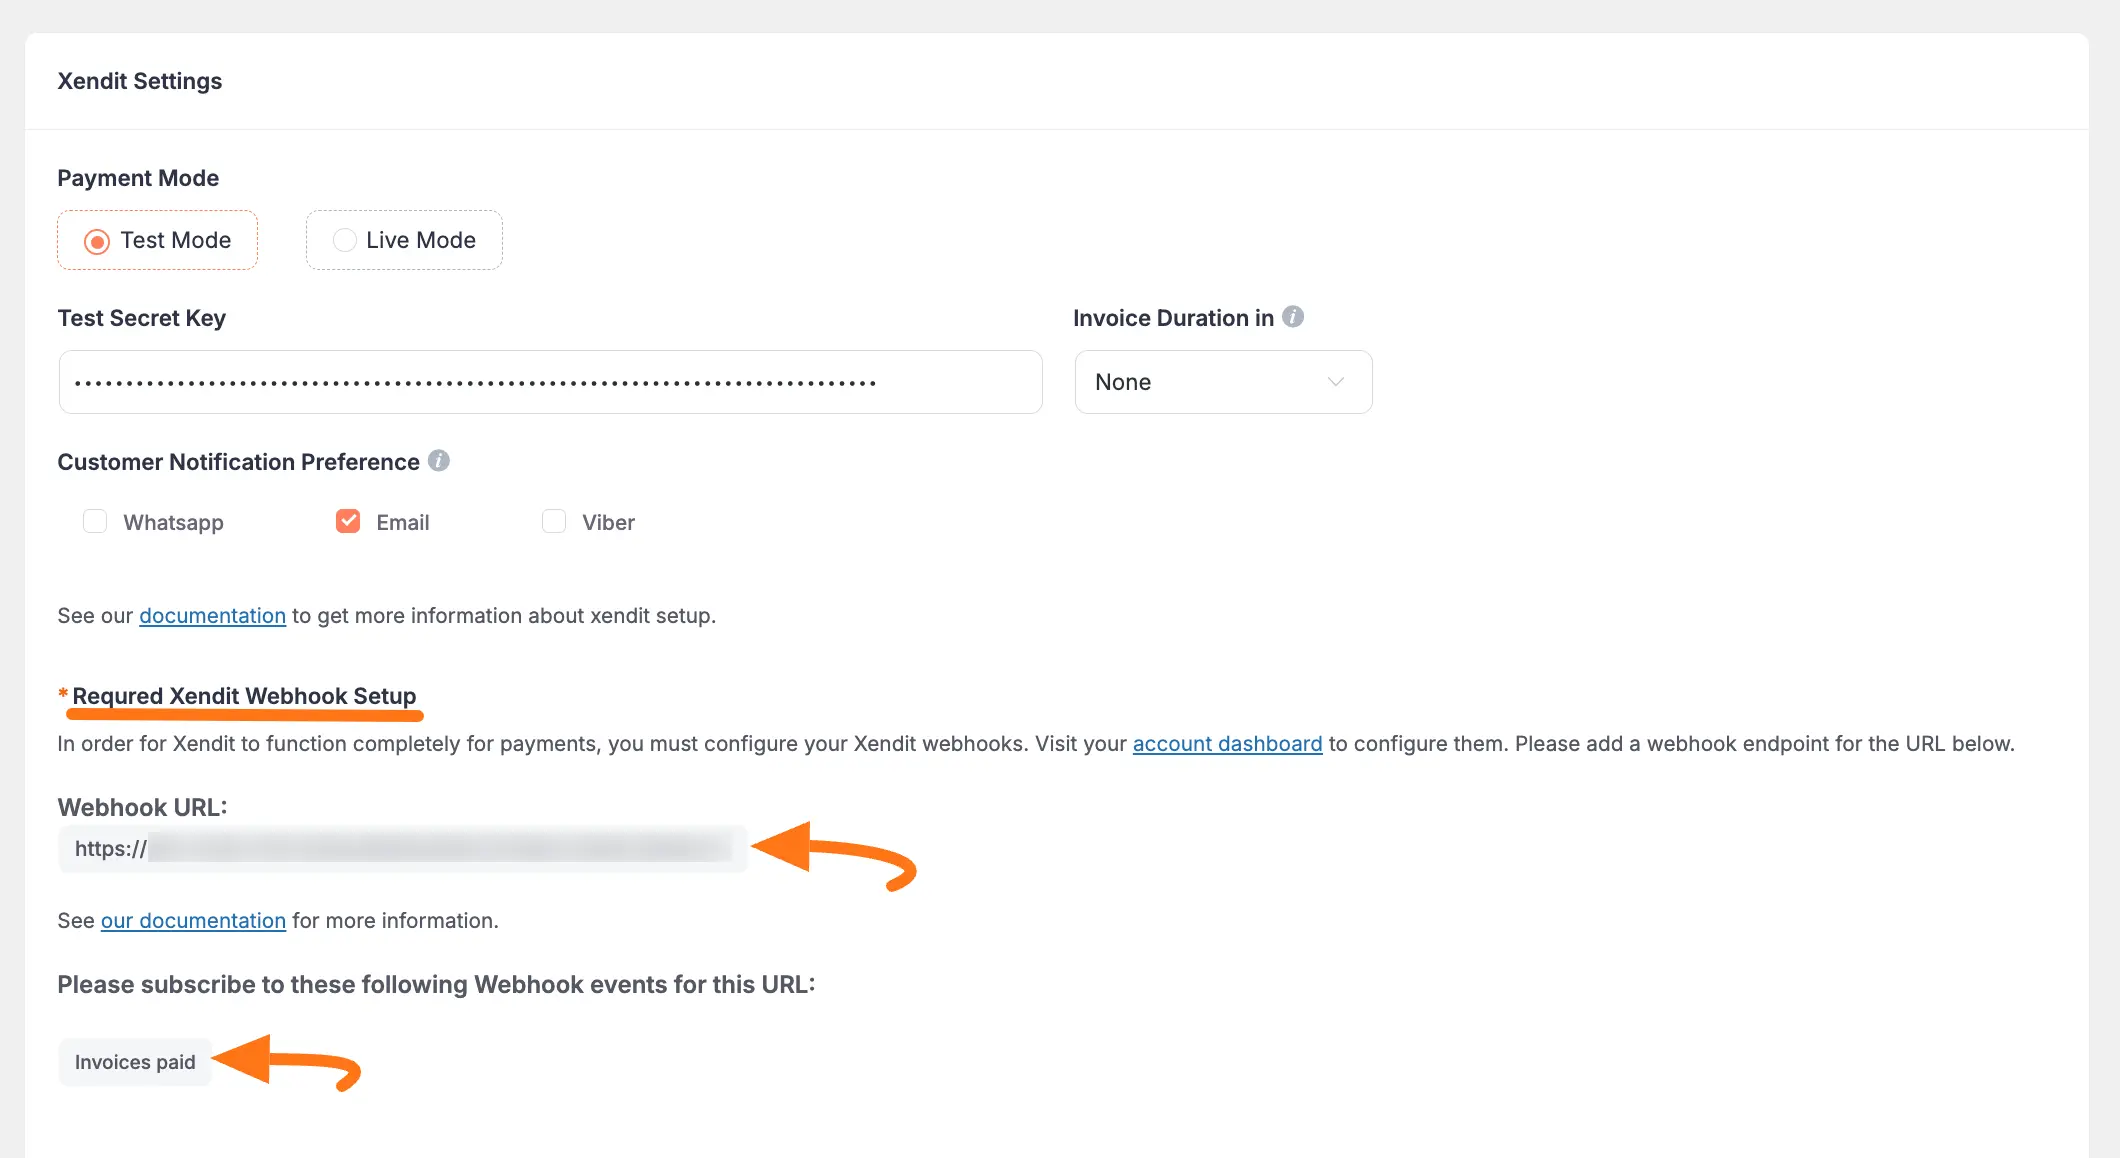
Step 1: Get the Webhook URL from Paymattic
The first step is to copy the unique notification URL from Paymattic.
- In the Xendit settings page within Paymattic, find the Webhooks section and copy the Webhook URL.
- This URL is the specific address that Xendit will send notifications to for transaction synchronization.
Step 2: Set the Webhook URL in Xendit
Now, you need to provide this URL to Xendit.
- Go back to your Xendit Dashboard.
- Navigate to Settings → Developers → Webhooks.
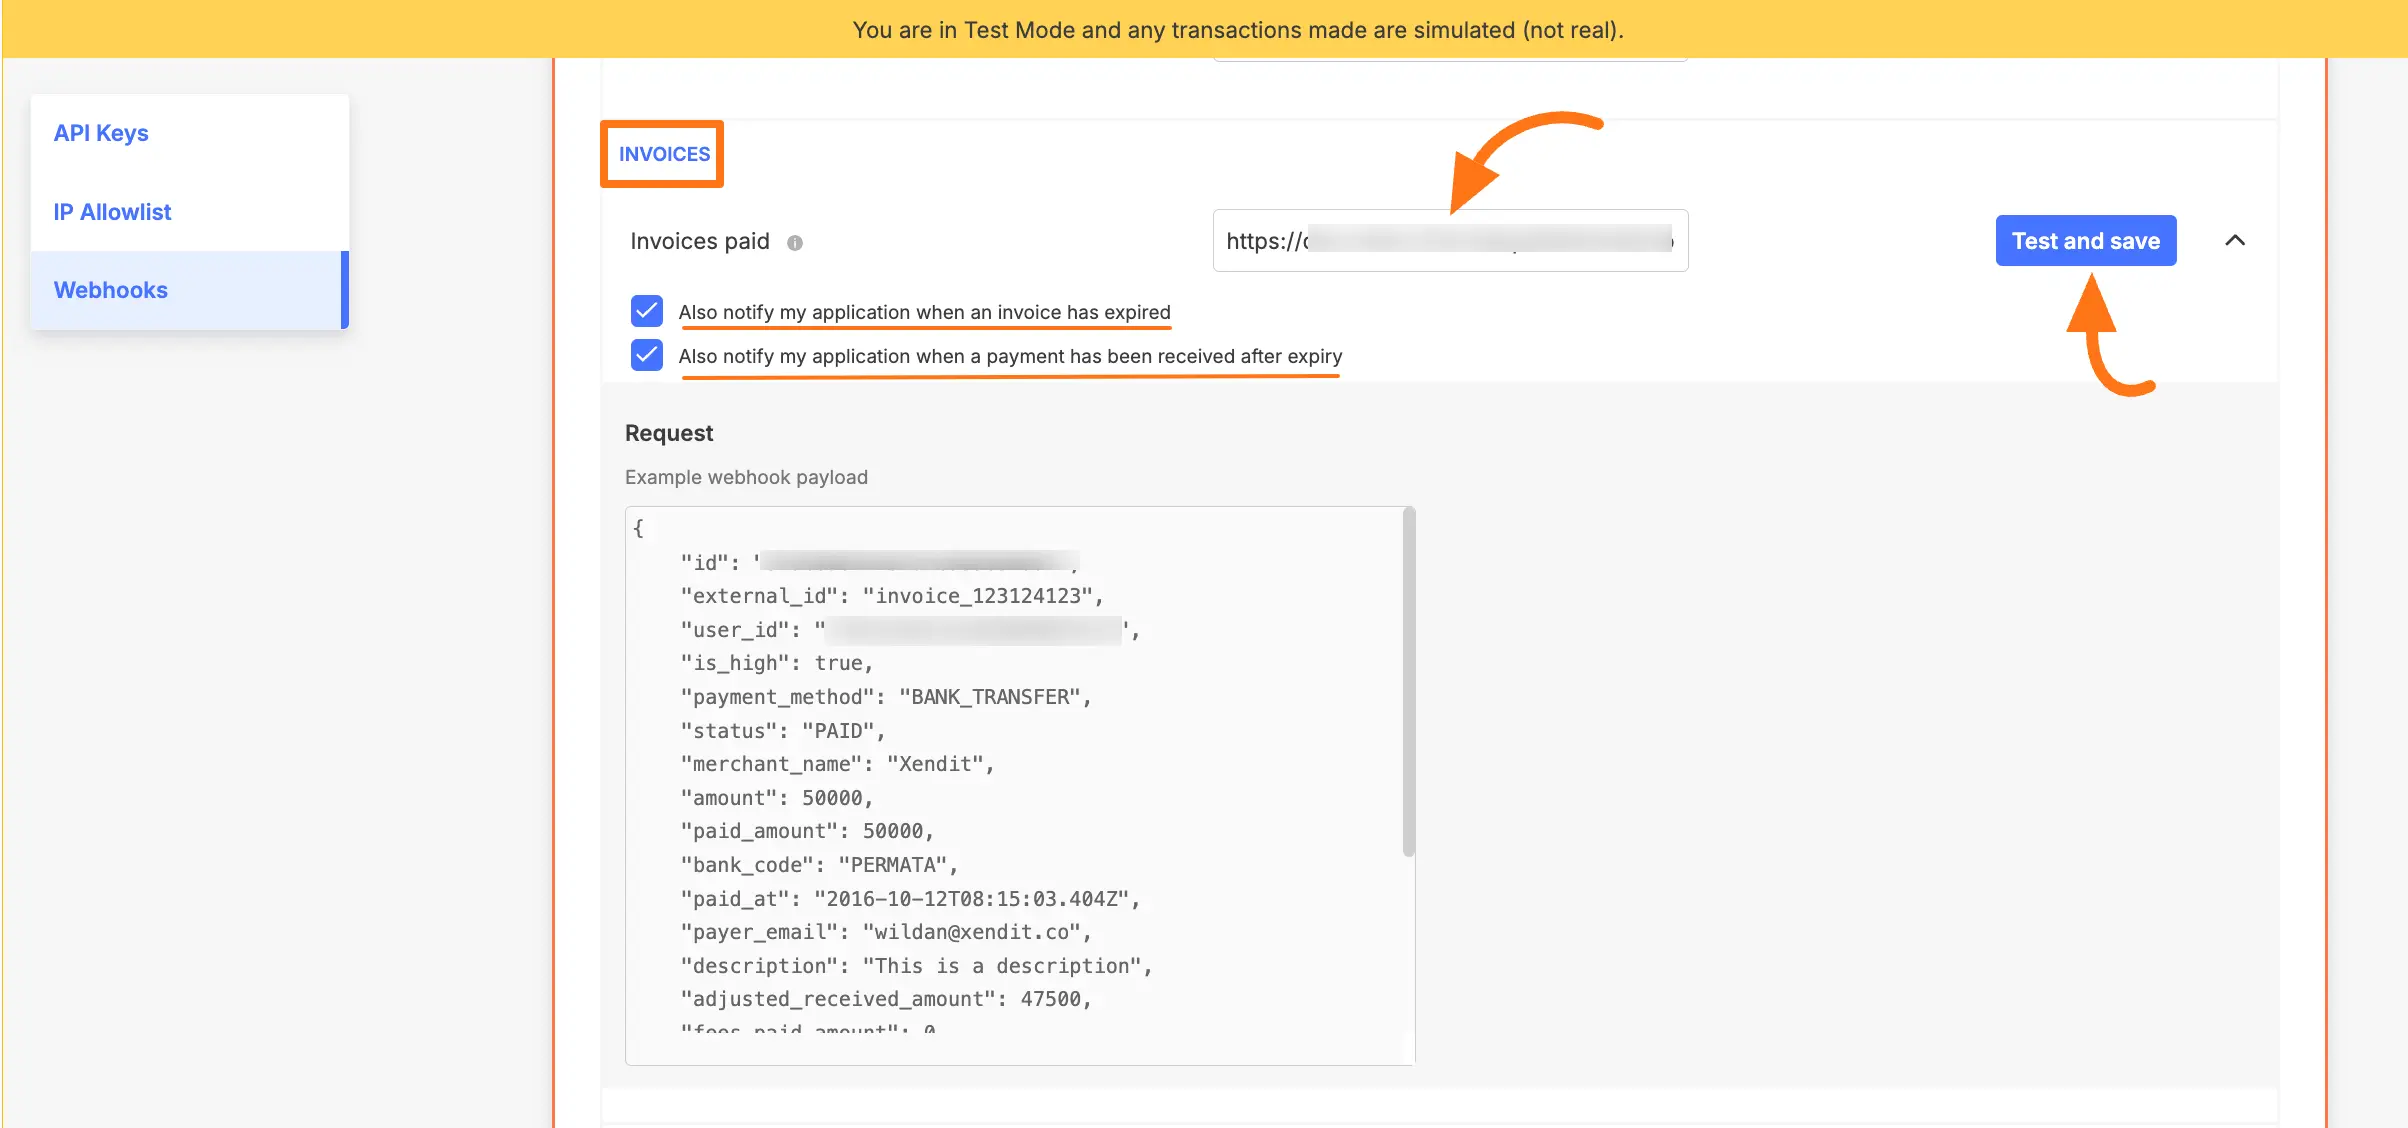
- In the Invoices section, where you configure notifications for completed payments:
- Paste the Webhook URL you copied from Paymattic into the provided field.
- Check the Notification Boxes for "Paid/Expired" to ensure you receive updates for these events.
- Click Test and Save to confirm the URL is working and save the configuration.
Using Xendit in Your Payment Forms
With the global integration complete, you can now enable Xendit as a payment method in your individual forms.
- For existing forms: Add it to any Payment Form
- For new forms:
- Learn more about adding payment methods
Note
The Xendit payment method will not function unless you complete the configuration process properly.
Need Help?
If you have any questions, concerns, or suggestions, please contact our support team. We're here to help!