Dynamic Payment Item Field
In Paymattic, the Dynamic Payment Item, an in-built calculation feature for Number and Product fields, allows users to perform real-time mathematical operations within any Payment Form.
This article will guide you on how to embed the Dynamic Payment Item field to the WordPress Site through Paymattic.
WARNING
Remember, Dynamic Payment Item is a premium feature and you need the Paymattic Pro Plugin to use this field.
Adding Dynamic Payment Item Field
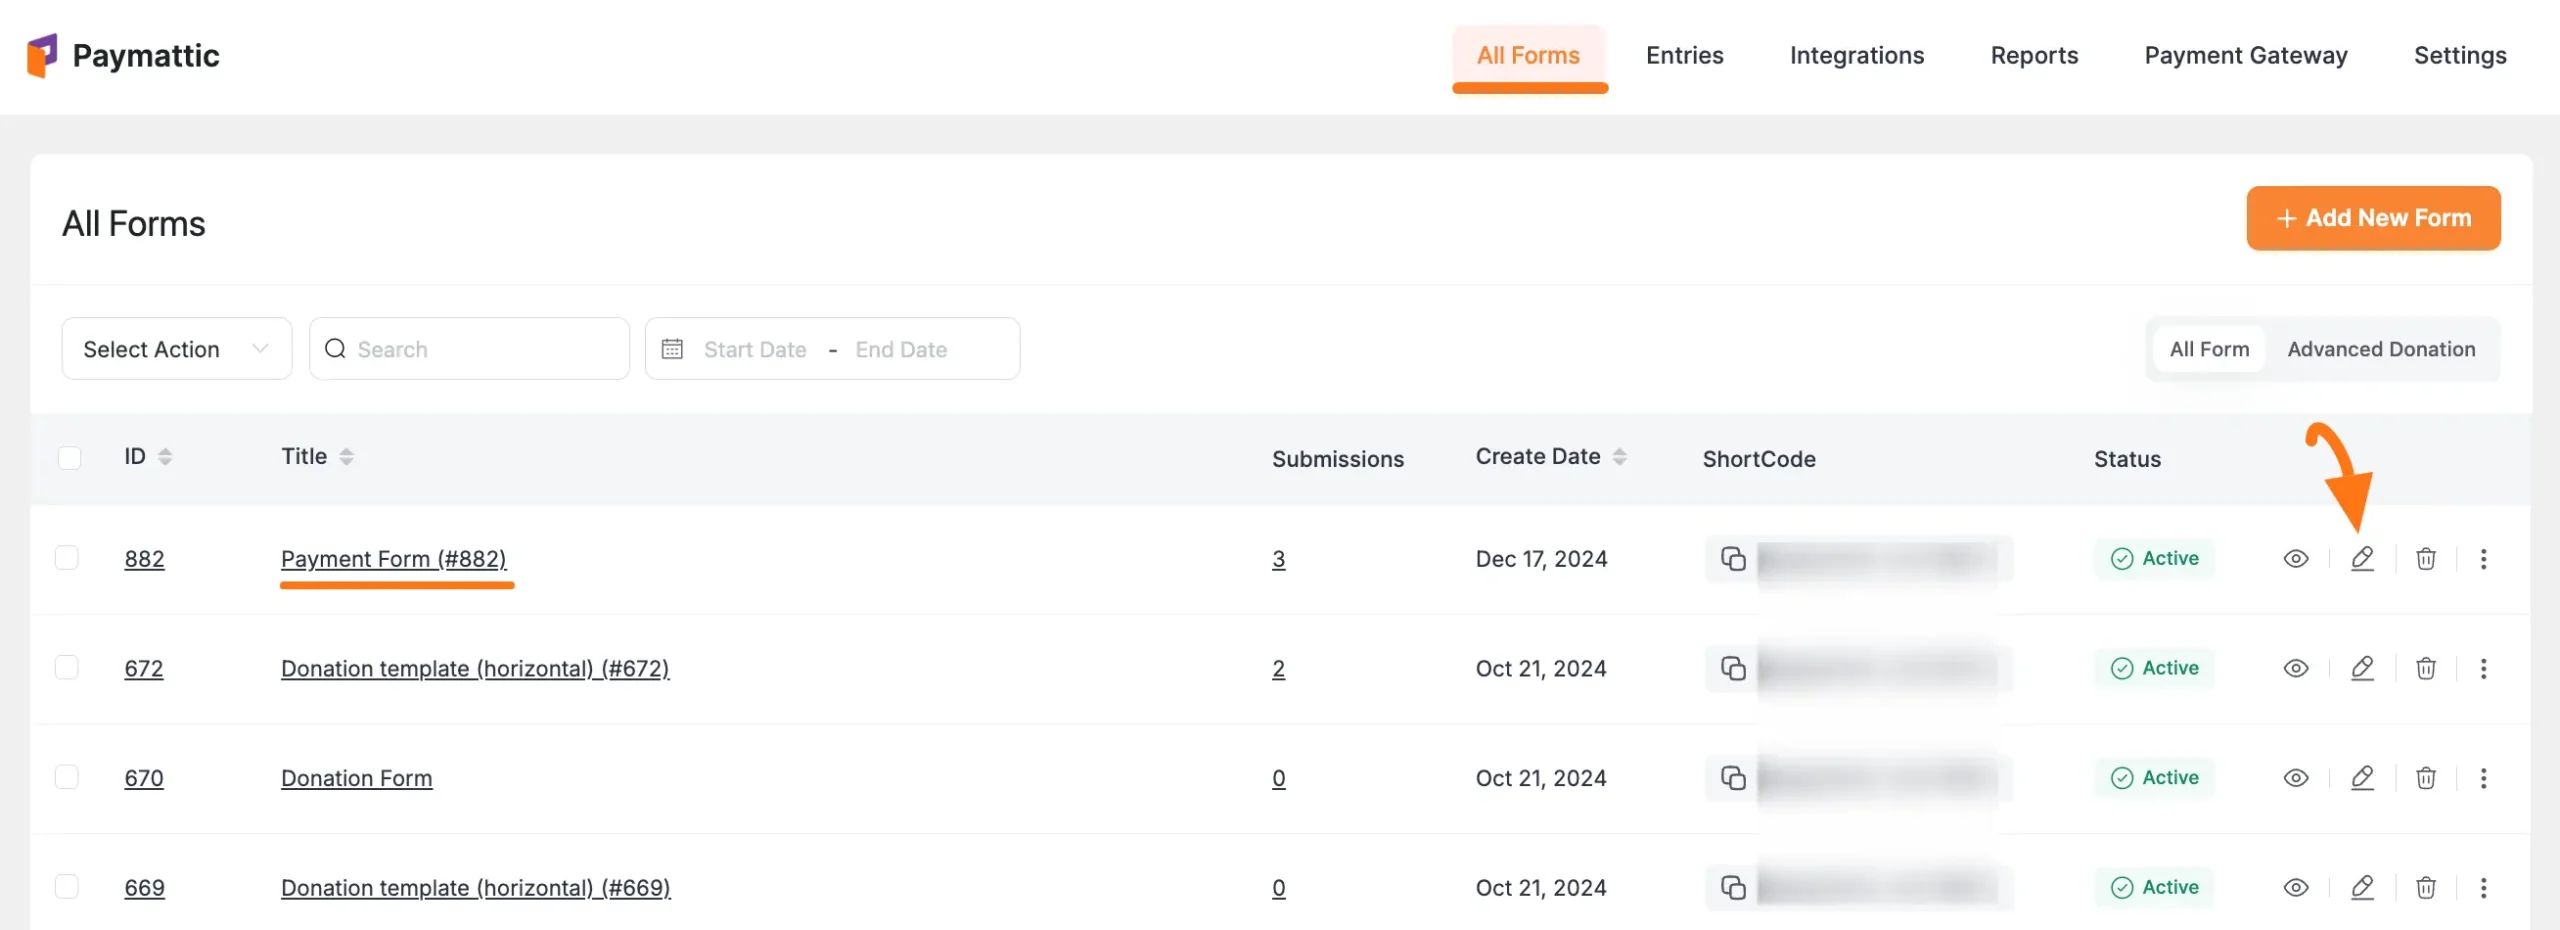
First, go to the All Forms section from the Paymattic Navbar, choose a Form, and click the Pencil/Edit icon to open the Editor page of that form.
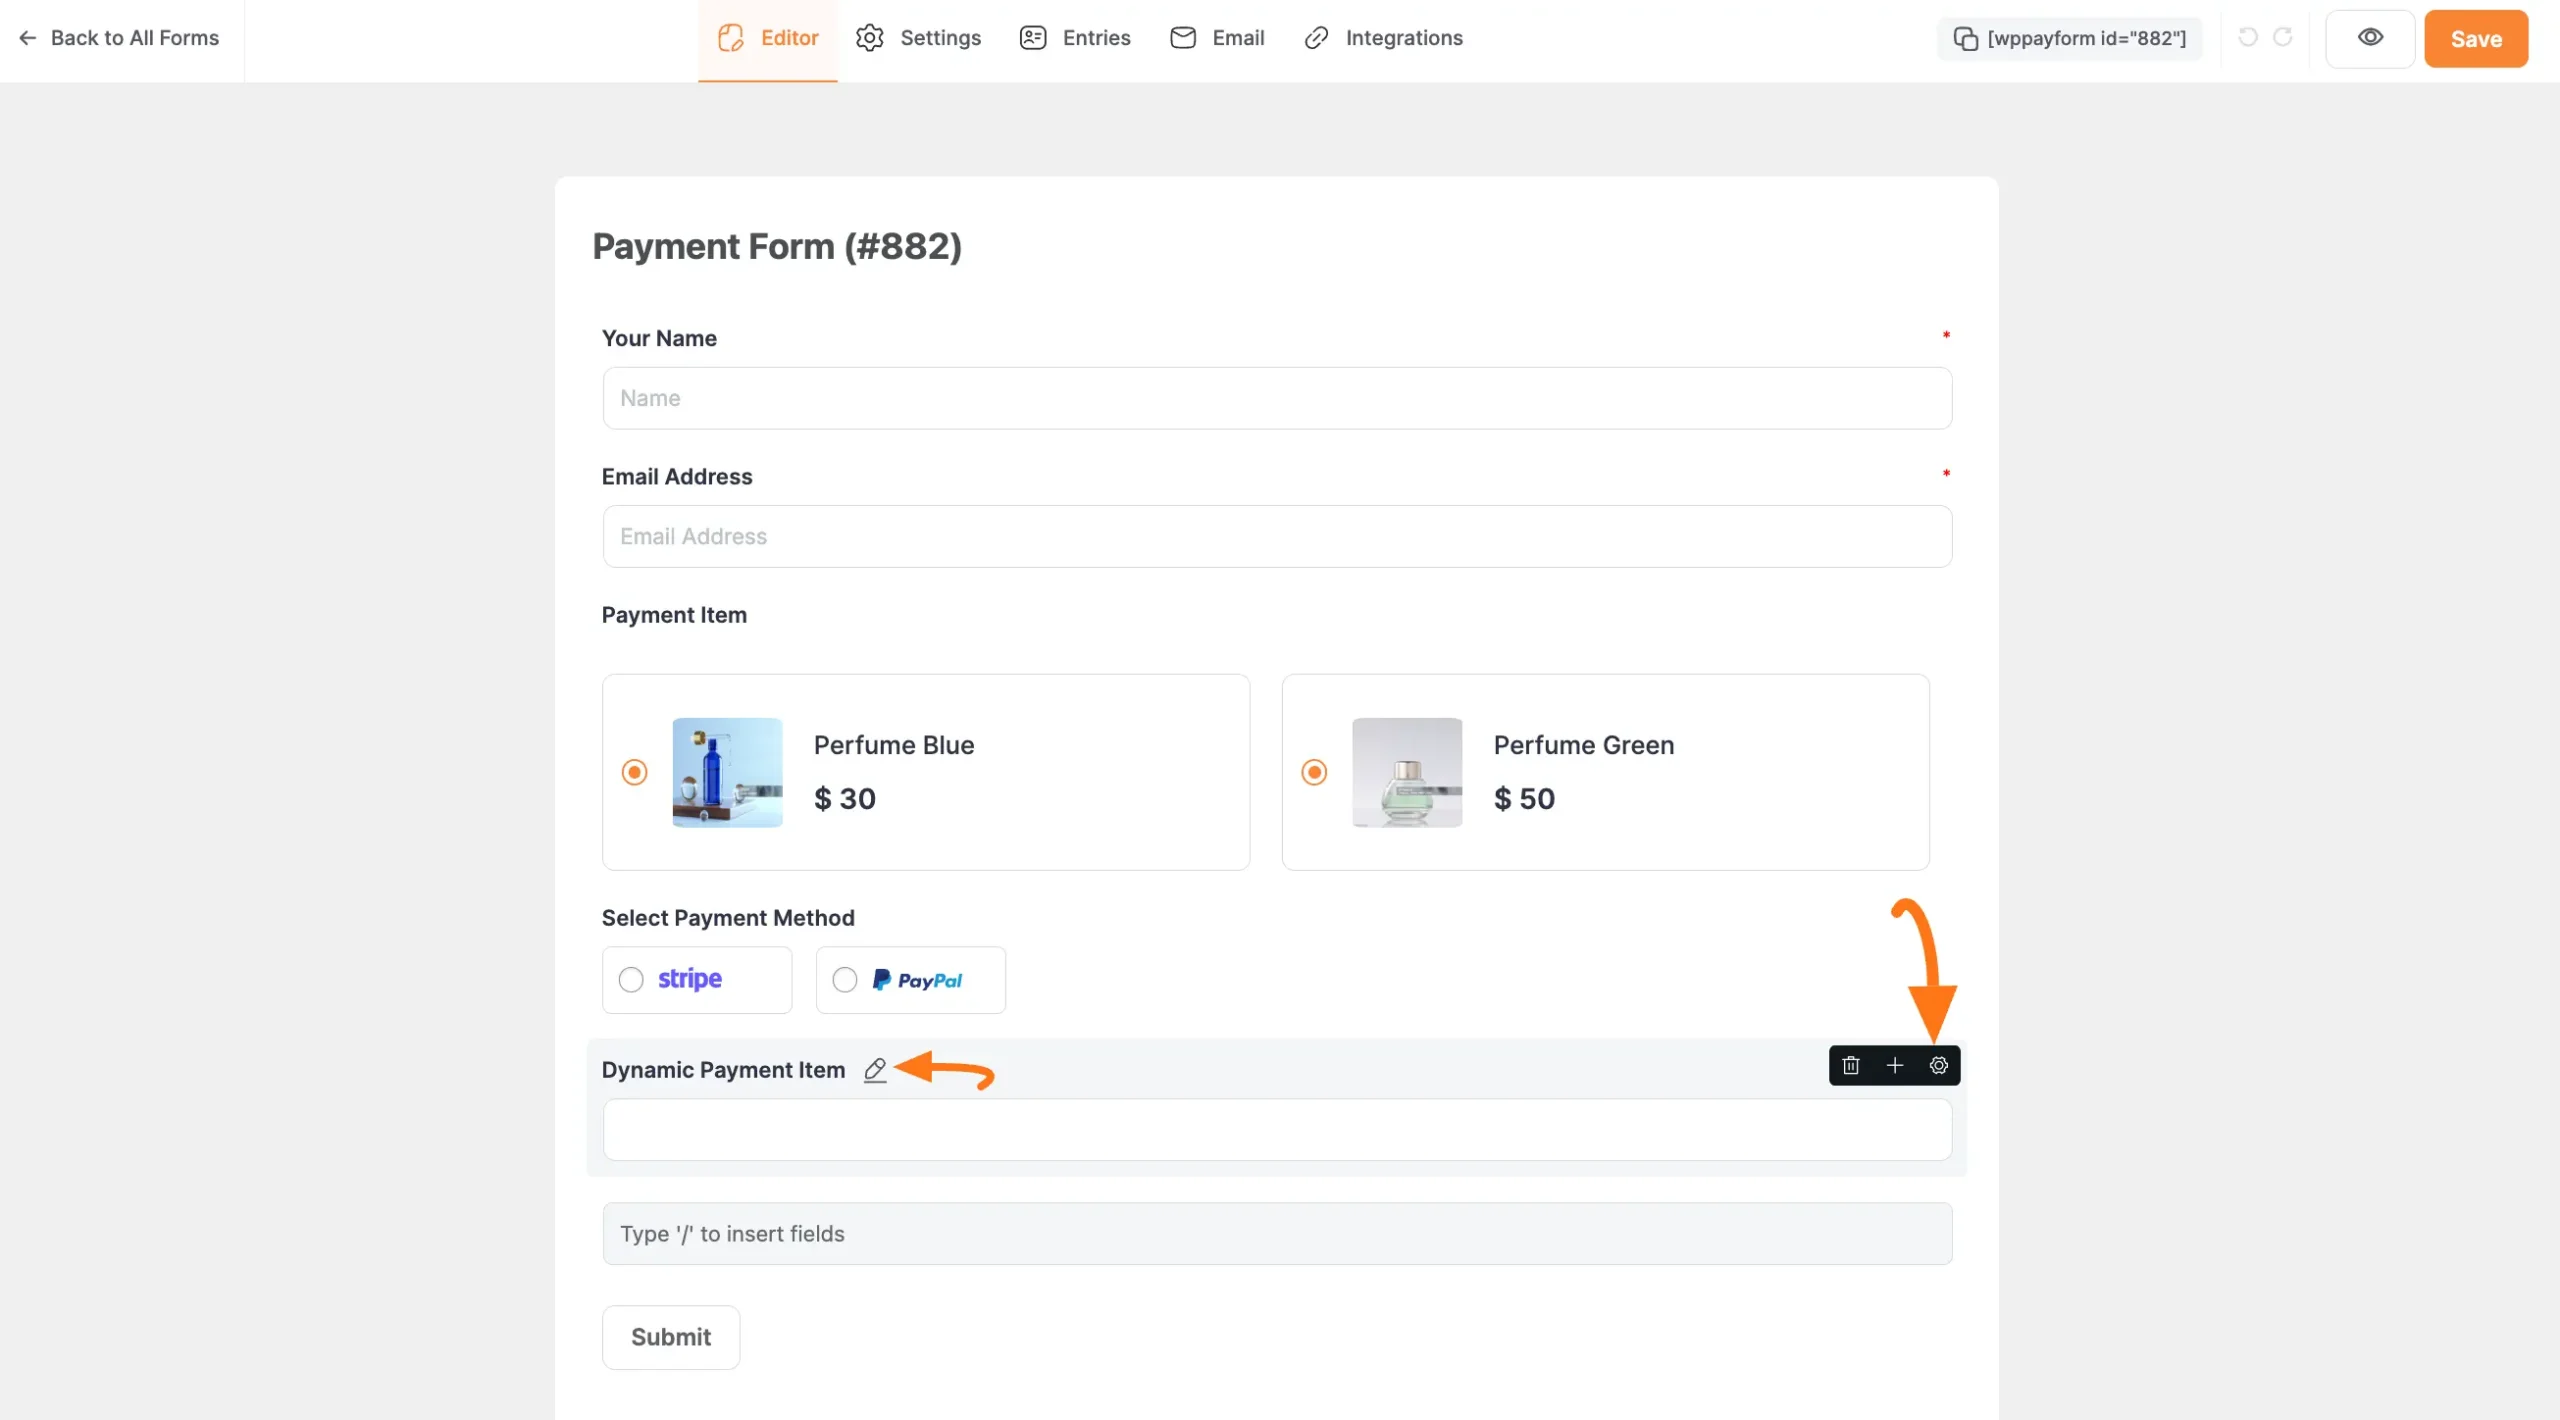
Once you open the Editor page, add the necessary fields by typing the "/" or clicking the Plus Icon placed at the bottom.
WARNING
Remember, to add a Payment Gateway you must add at least one Product Field field.
![]()
For example, I choose the Plus Icon option to select the Dynamic Payment Item field under the Donation & Product Fields section from the Choose Form Field page.
TIP
Also, don't forget to add a product field (e.g., Payment Item, or Subscription Payment field) to make the Dynamic Payment Item field functional, along with a Payment Method Field to collect payments.

Add Calculation Expression
Now, to make the added Dynamic Payment Item field functional for the desired calculation, you need to set up the Calculation Expression in the Settings.
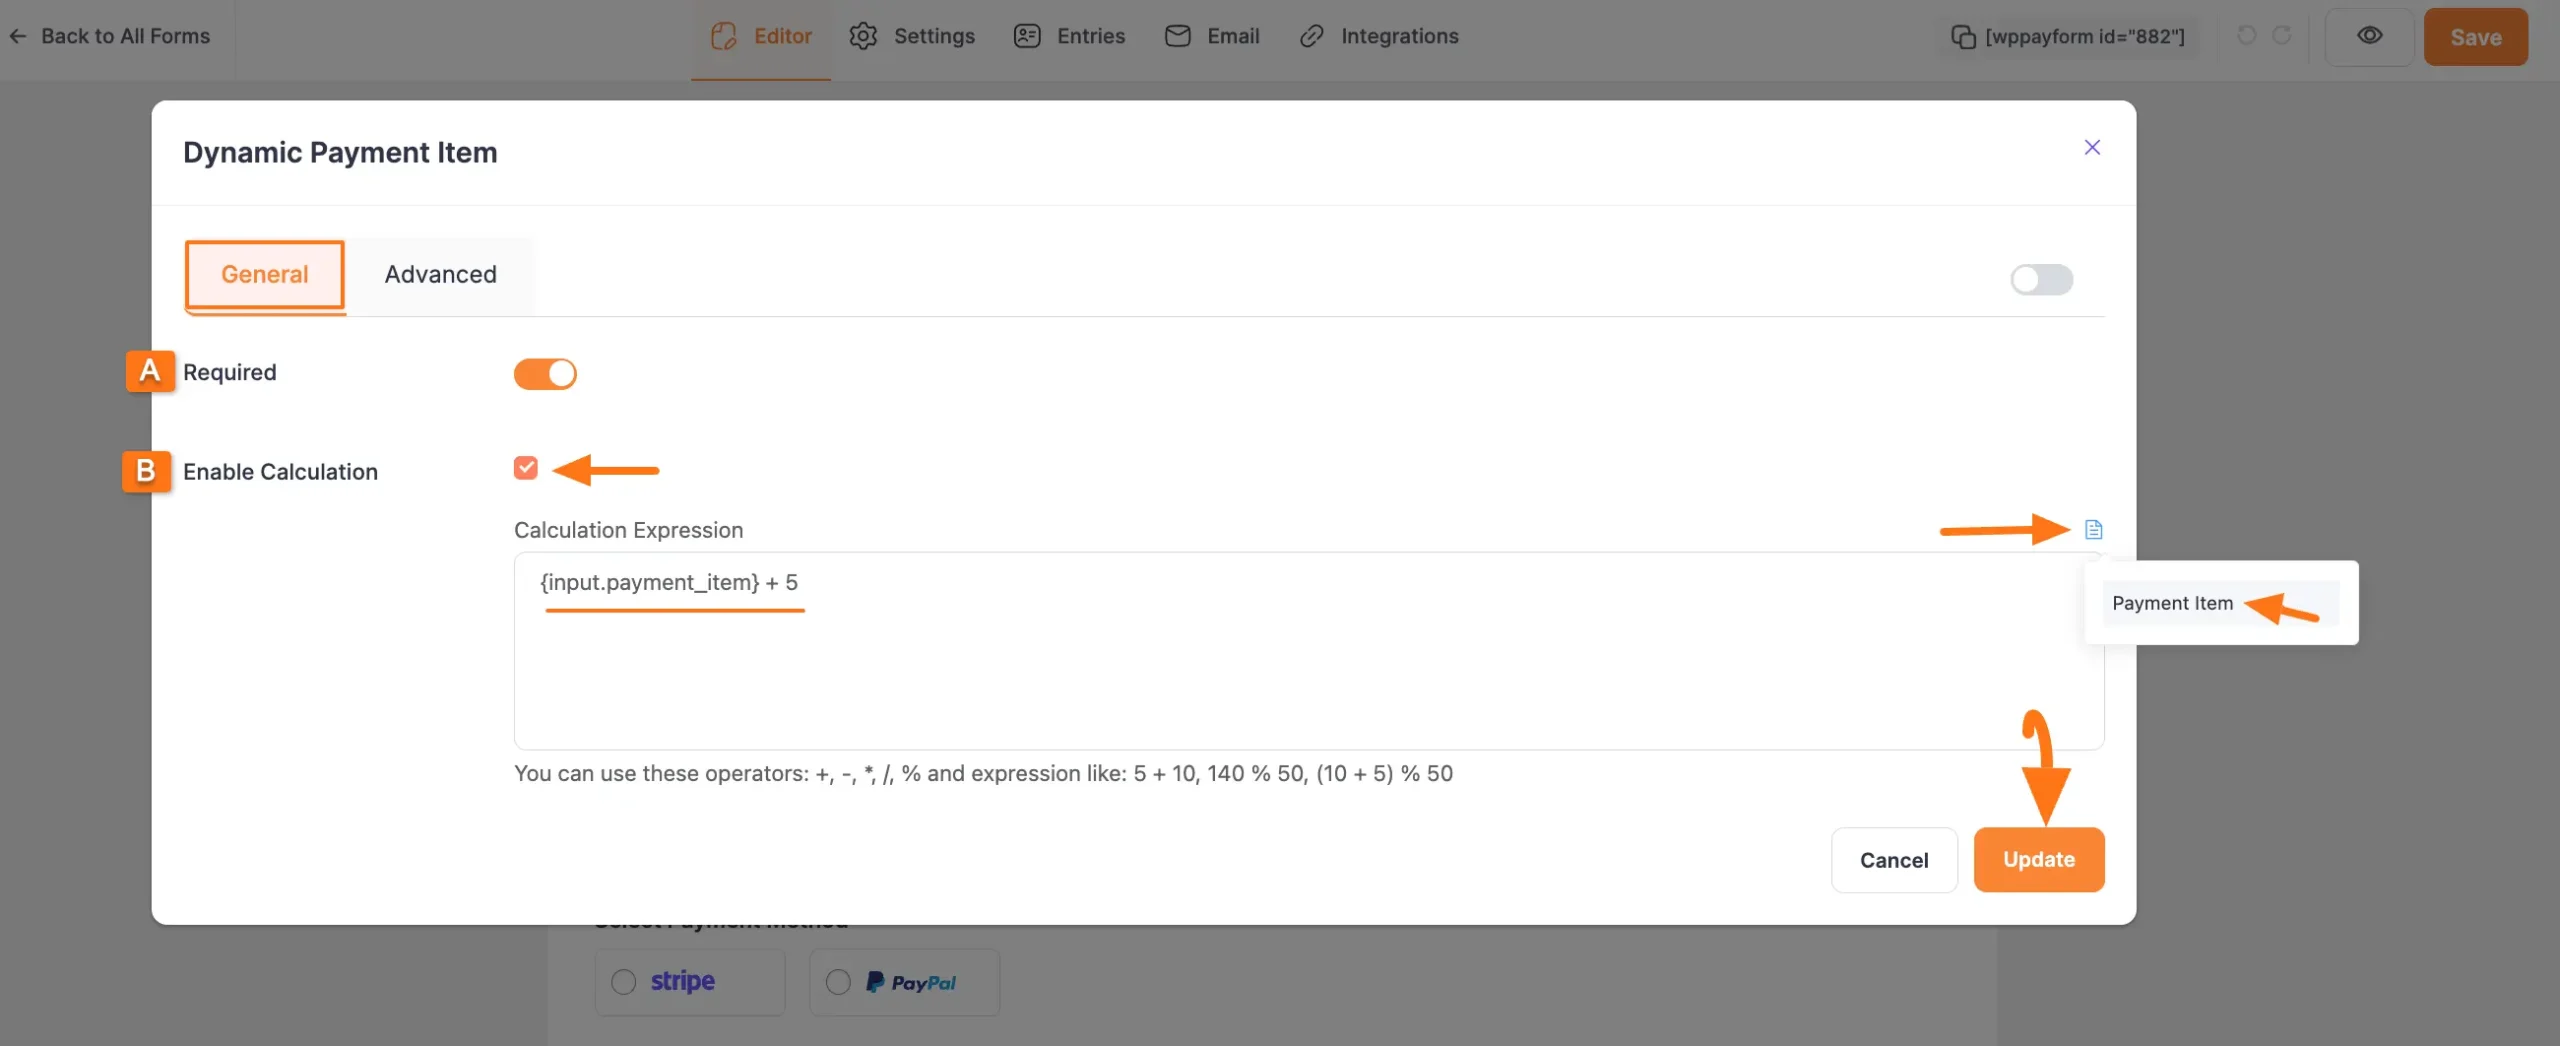
To add the Calculation Expression in the Dynamic Payment Item field according to your needs, click the Settings Icon from the right-side corner.
TIP
You can also Edit the Field Label according to your needs using the Pencil Icon right next to the field name.
Now, a pop-up page will appear with various settings options for customizing the field.
General Settings
All the Settings under the General Tab mentioned in the below screenshot are briefly explained:
A. Required: Enable this option to make this field mandatory for users to fill in for successful form submission.
B. Enable Calculation: Now, click the checkbox to enable the Calculation Feature. Then, add the desired equation under the Calculation Expression box to ensure what calculation you want to perform.
First, click the Document Icon on the right side to add the available input fields on which you want to perform the calculation. Then, you can use the desired mathematical operators (+, -, *, /, %) in your expression.
For example, in the screenshot below, you can see that I used the "{input.payment_item} + 5" as Calculation Expression to add a delivery charge to the items' price. As a result, when users select an item during form-filling, they will see both the original price and the total price (including the delivery charge) for the chosen item.
Once you finish, click the Update button to save all your configuration.
Advanced Settings
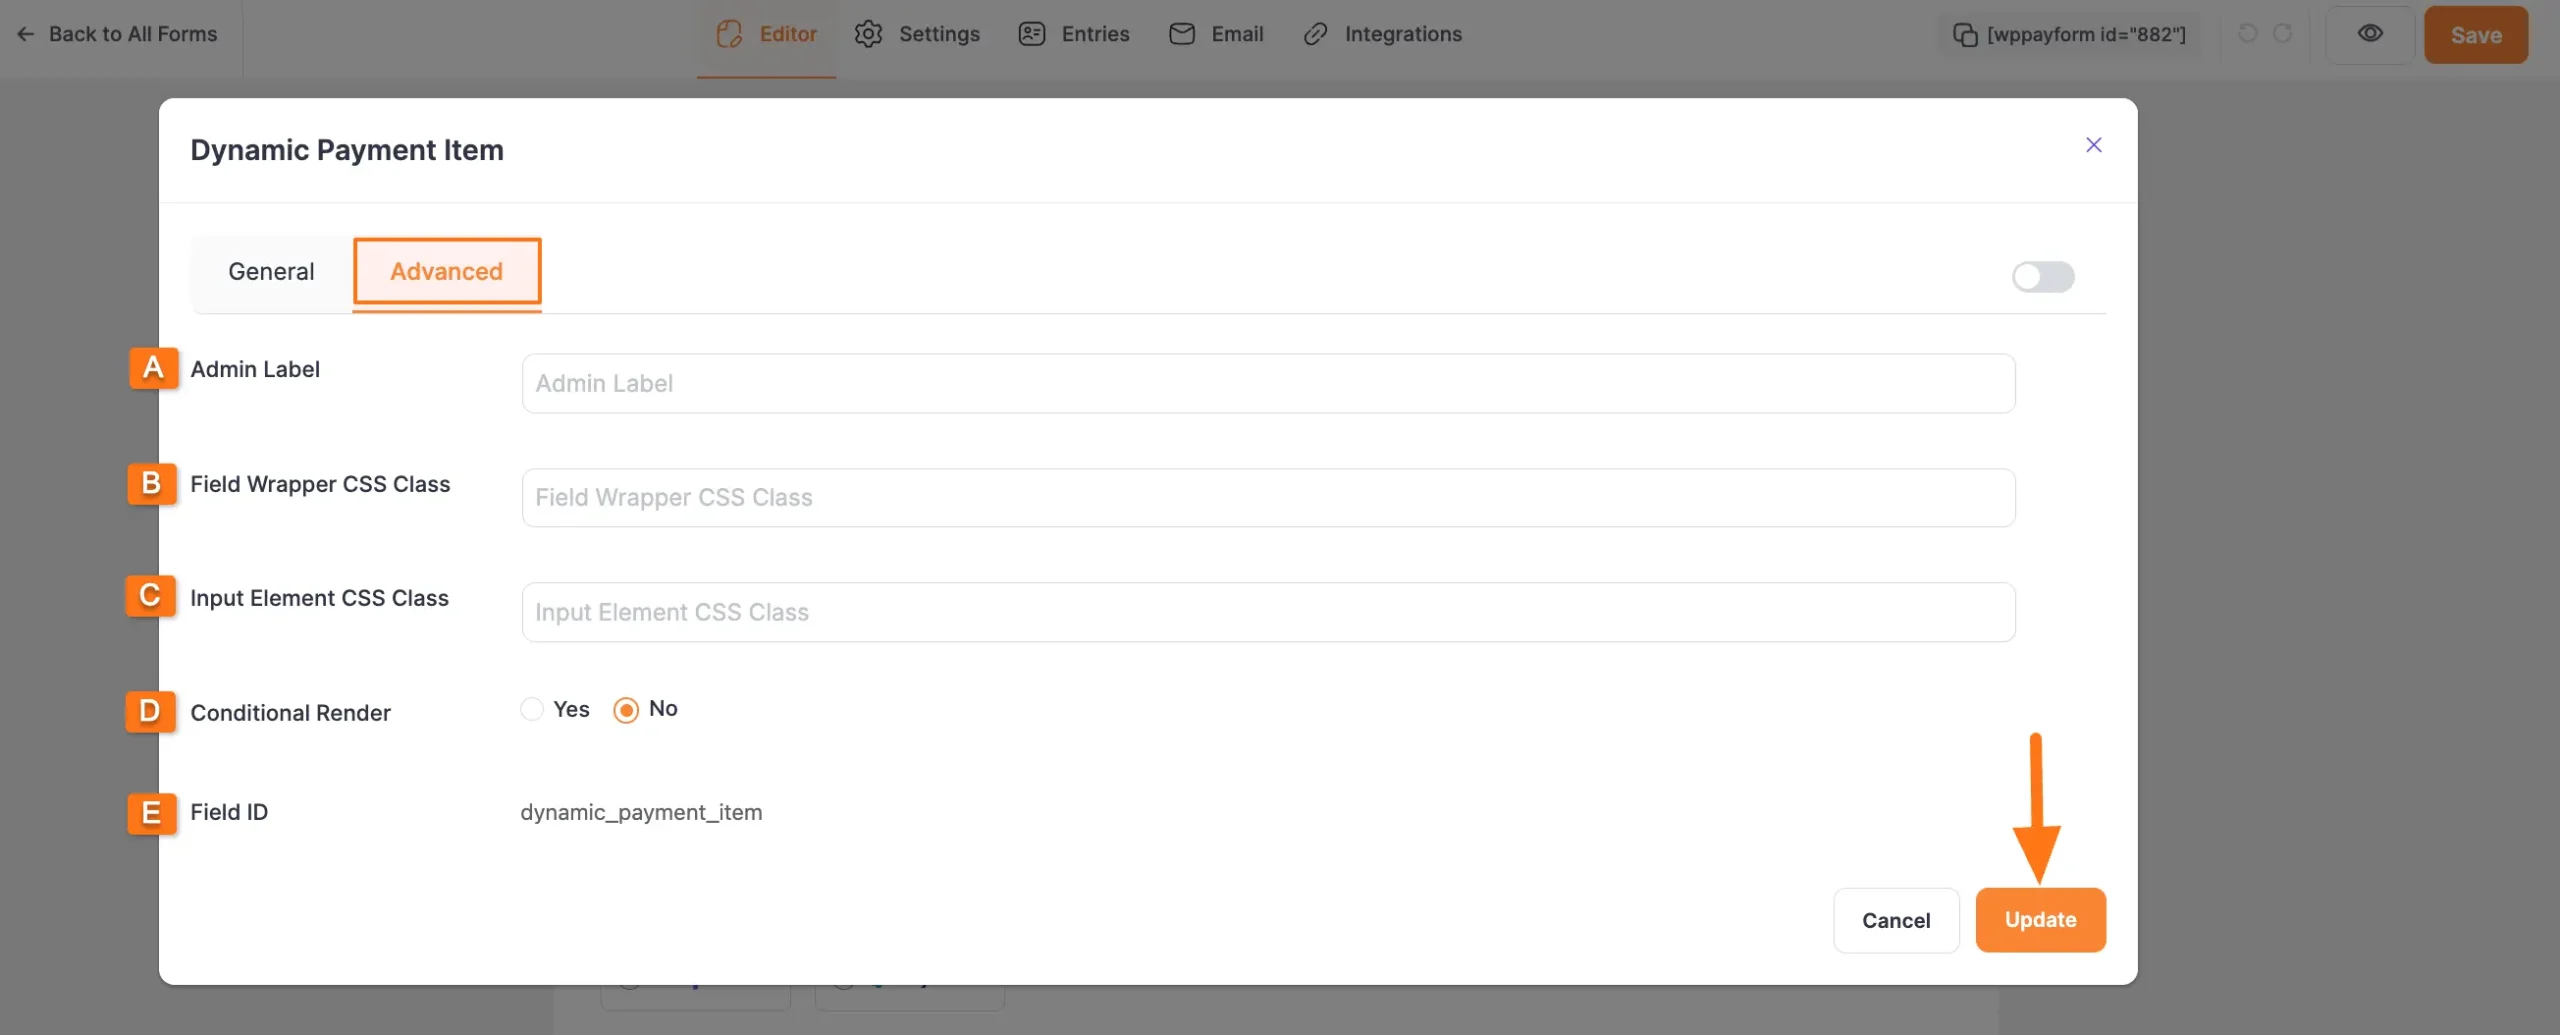
Once you complete the General settings, go to the Advanced tab, and you will find some advanced settings for your Dynamic Payment Item field. These are:
A. Admin Label: This label is used for the admin who wants to see the field's label from the back end.
B. Field Wrapper CSS Class: This is used for adding a Custom CSS/JS for an entire field of a specific form using the Field Wrapper CSS Class element. To learn more, click here.
C. Input Elements CSS Class: This is used for adding a Custom CSS/JS for a specific input field of a form using the Input Elements CSS Class element. To learn more, click here.
D. Conditional Render: You can set conditional logic to display the field in the form that will be triggered by specific actions taken on a previous input field. To learn more about conditional renderings, click here.
E. Field ID: This option is used to add or track form fields. Plus, creating the custom CSS/JS for a specific form field.
Once you finish, click the Update button to save all your configuration.
Embedding Form into Front-end
Here, you can see the Dynamic Payment Item field and other necessary fields are added to the form.
TIP
You can edit their field name and settings. To learn more about form editing, read this Documentation.
Now, to embed and display the form on a specific Page/Post, copy this Shortcode and paste it into your desired Page/Post.
Once you complete the edit, press the Save button to save all the changes you made. Also, to see the Preview of the form, click the Eye icon.

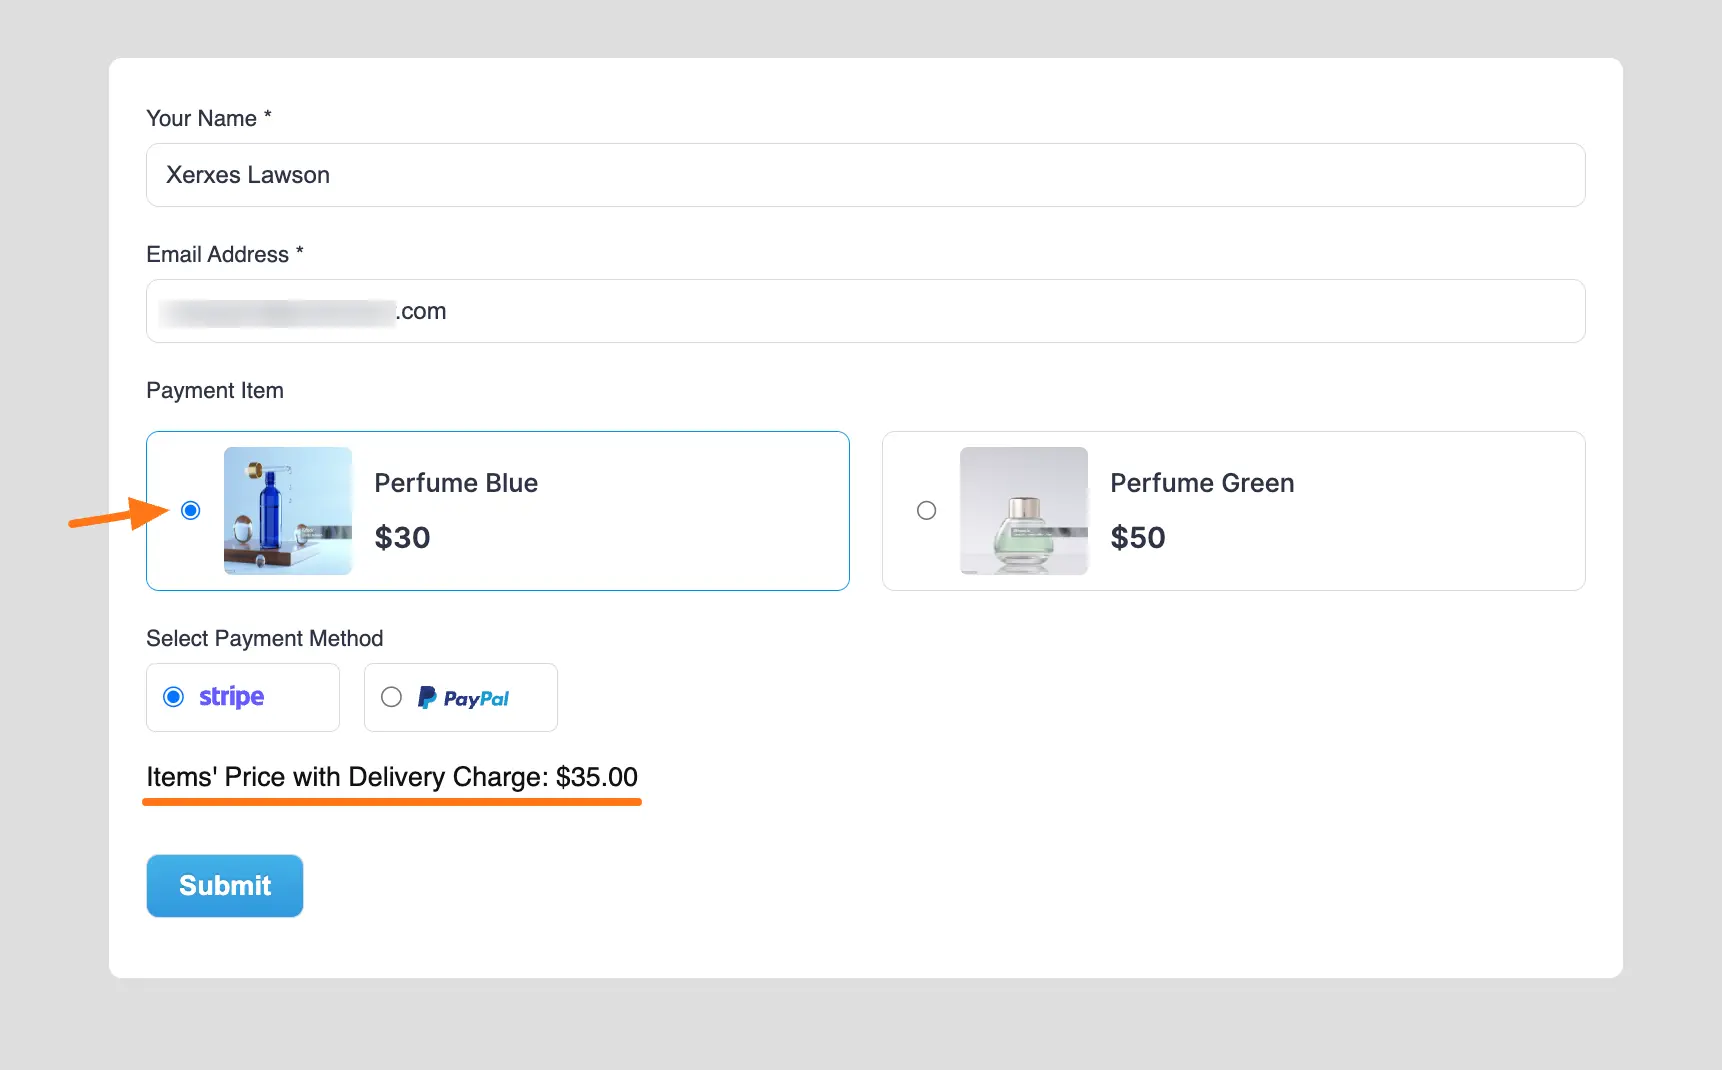
Preview of the Dynamic Payment Item field
Here is the preview of the Dynamic Payment Item field in a Form.
You can see that when the user selects the Perfume Blue Item, the Dynamic Payment Item field instantly adds $5 to the original price and displays the price including the delivery charge.
Supported Mathematical Expression
To learn more details about the use case of all available mathematical Operators supported by Paymattic to perform calculations, read the following table.
| Symbol | Explanation |
|---|---|
| + | Addition Operator Use Case: 2+3 = 5 |
| – | Subtraction Operator Use Case: 2-3 = -1 |
| / | Division Operator Use Case: 3/2 = 1.5 |
| * | Multiplication Operator Use Case: 2*3 = 6 |
| % | Percentage Operator Use case: 100 % 10 = 10 |
| ( | Opening Parenthesis |
| ) | Closing Parenthesis |
| round | Make a number a decimal/integer. Use case: round(3.235723663, 2) = 3.24 and round(3.235723663, 0) = 3 |
| ceil | Use case: ceil(3.235723663) = 4 |
| floor | Use case: floor(3.235723663) = 3 |
| abs | Use case: abs(-4.6) = 4.6 |
| max | Use case: max(10, 15) = 15 |
| min | Use case: min(10, 15) = 10 |
This way you can easily add the Dynamic Payment Item fields in Paymattic Forms!
If you have any further questions, concerns, or suggestions, please do not hesitate to contact our @support team. Thank you.